Note: This article was originally written for the residential low voltage hybrid. However, most of the settings remain the same across all hybrid platforms. Future updates to this article will distinguish between residential and commercial hybrid settings.
Related Articles
- Compatible Batteries & Other Batteries (Low Voltage Hybrid only)
- Battery Troubleshooting (Low Voltage Hybrid)
Contents
1. Battery Closed-Loop Settings (CAN)
2. Battery Open-Loop Settings (for LV hybrid only)
3. Additional Battery Settings
3A. Function Settings
3B. Smart Port Settings (Generator)
3C. Storage Mode Settings (Battery-related)
4. Energy Storage Mode Settings
4A. Time-of-Use Settings
4B. Self-Use Mode (Self-Consumption)
4C. Export Power Control Settings
4D. Peak-Shaving Settings
4E. Selling-First Mode (Export Priority)
1. Battery Closed-Loop Settings (CAN)
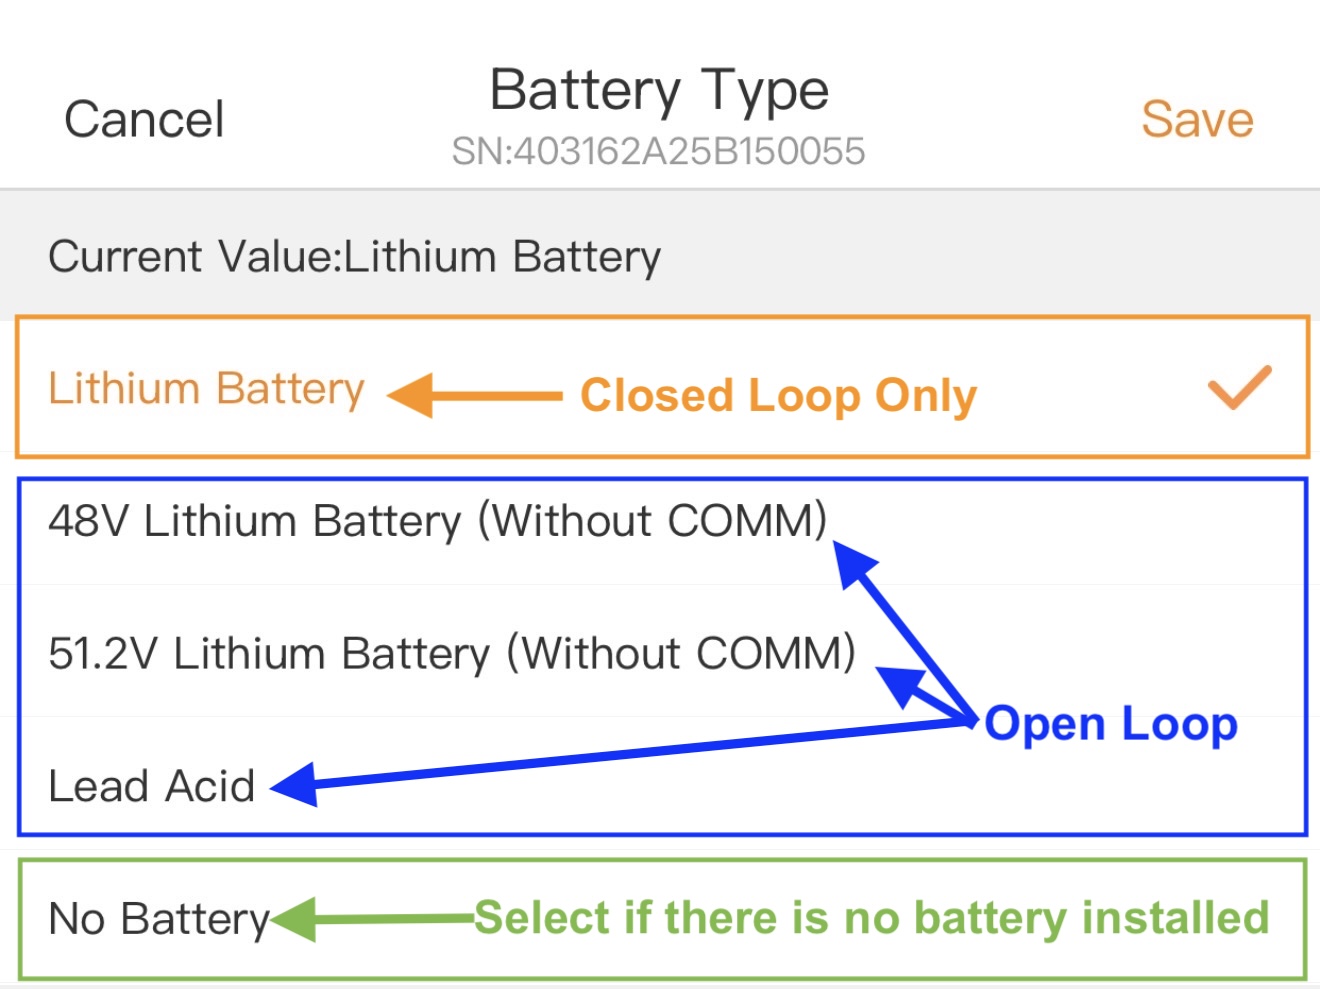
Battery Type: This setting allows you to select either closed-loop, open-loop, or no battery.
- All closed-loop batteries must use select “Lithium Battery” regardless
- Open-loop has three different options:
- 48V Lithium Battery (Without COMM)
- 51.2V Lithium Battery (Without COMM)
- Lead Acid
- If no battery is installed then “No Battery” must be selected or else the inverter will consistently throw battery communication alarms.
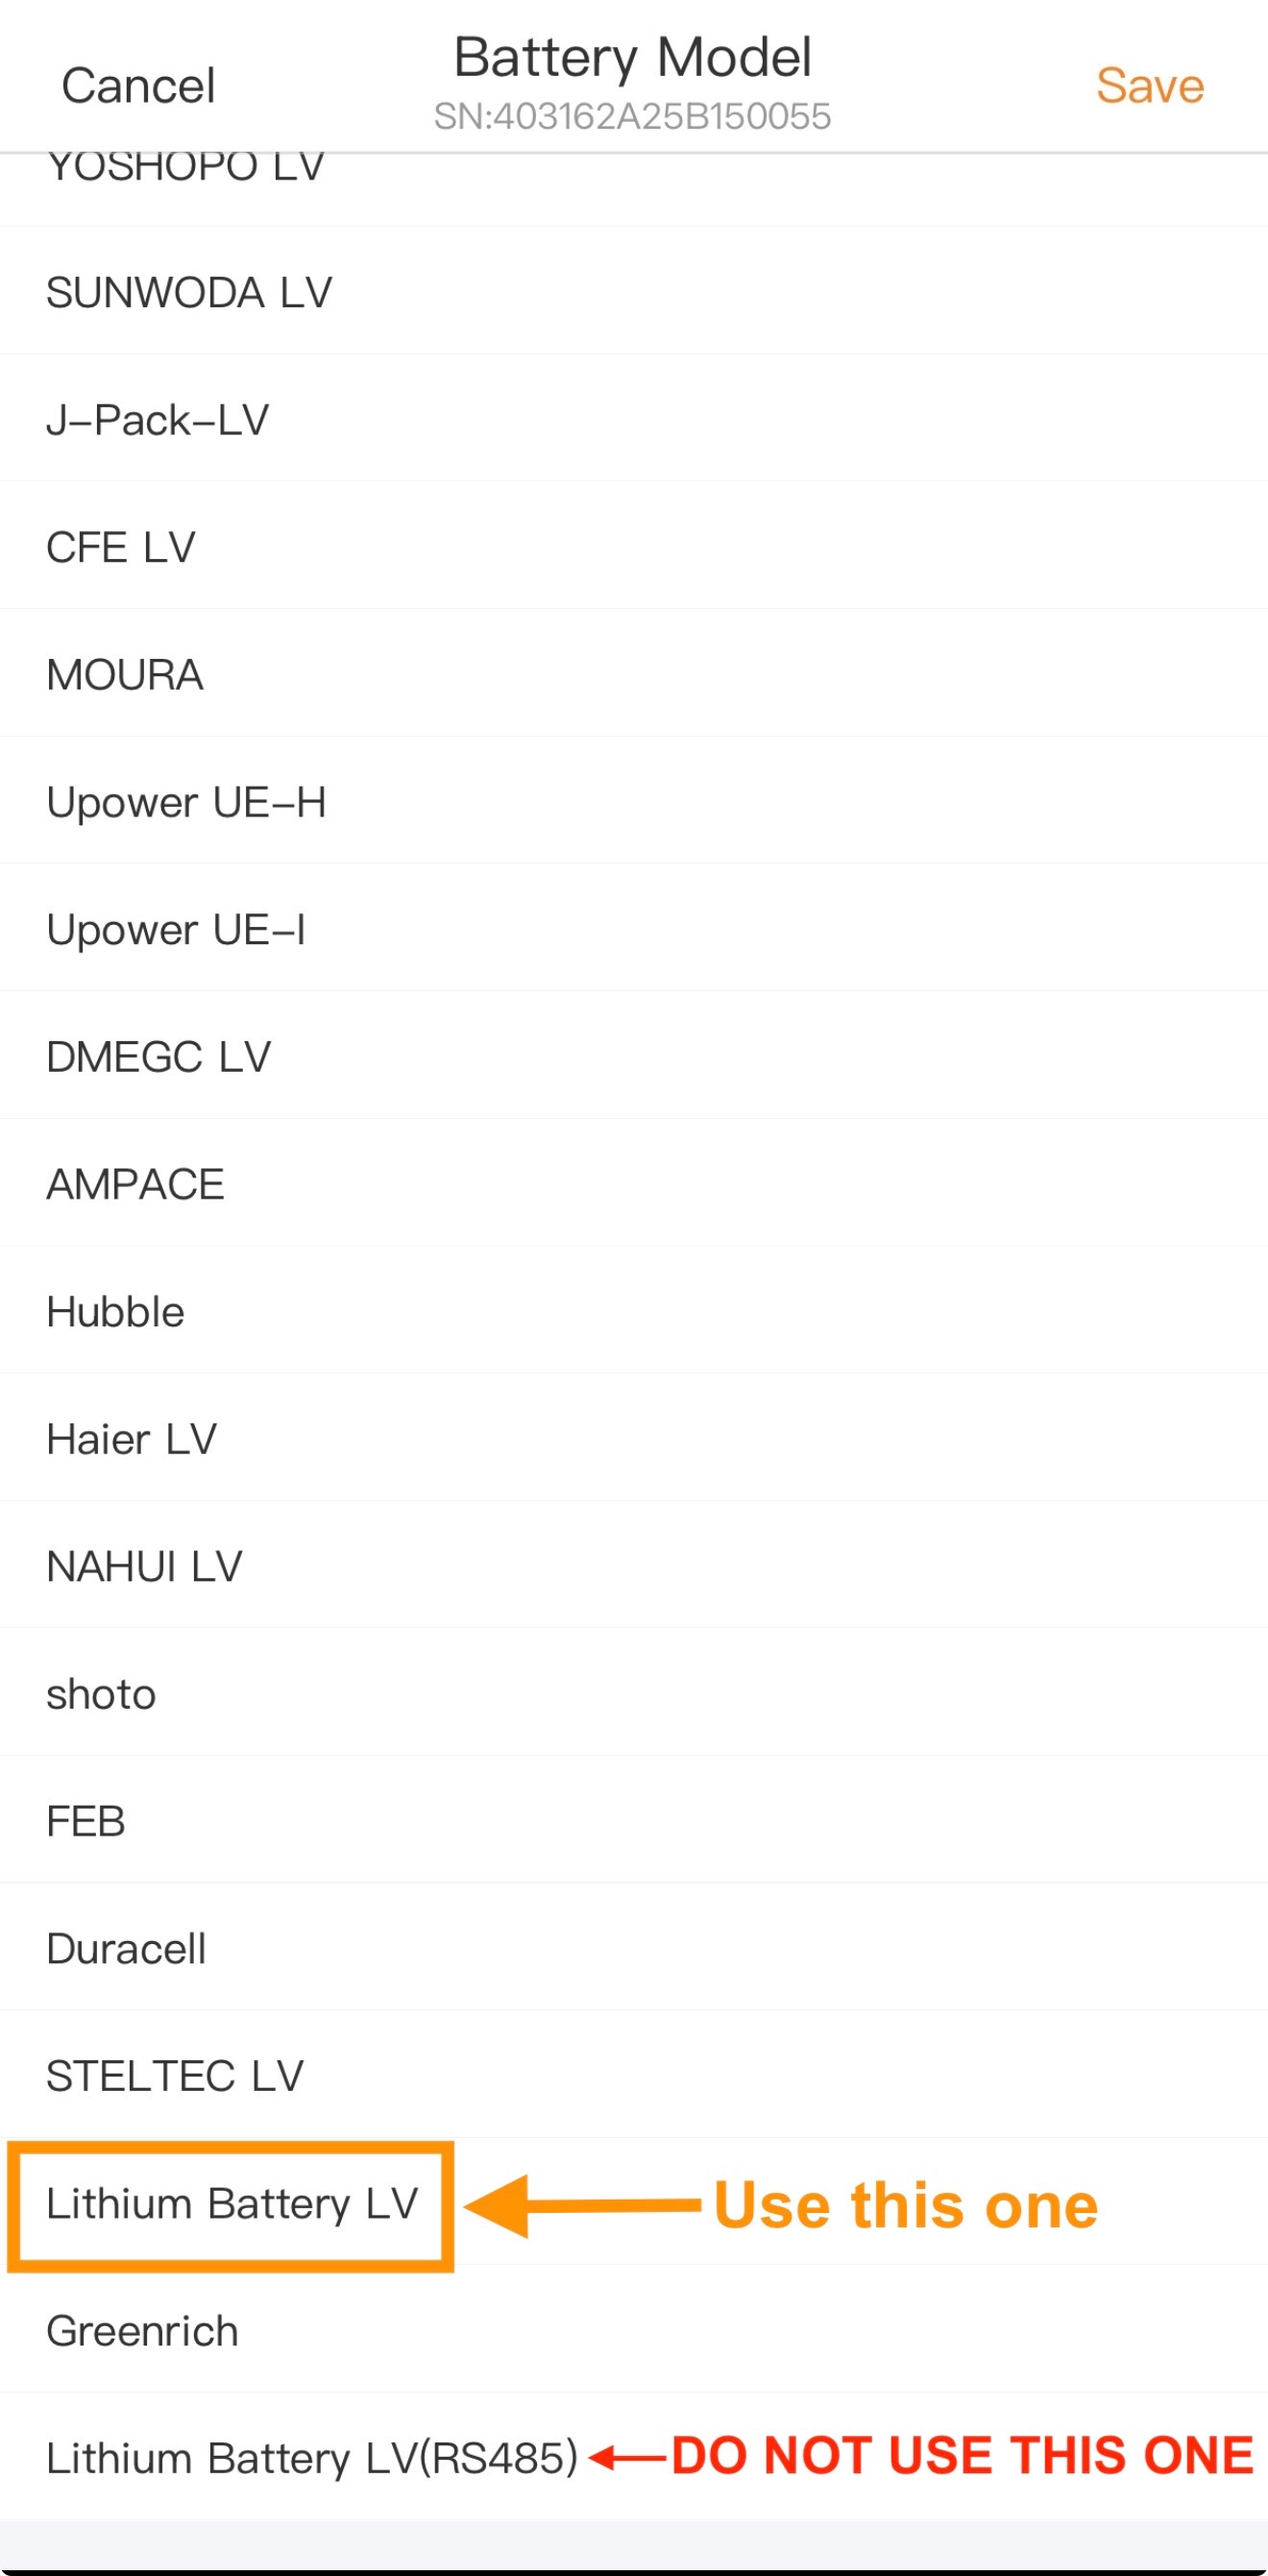
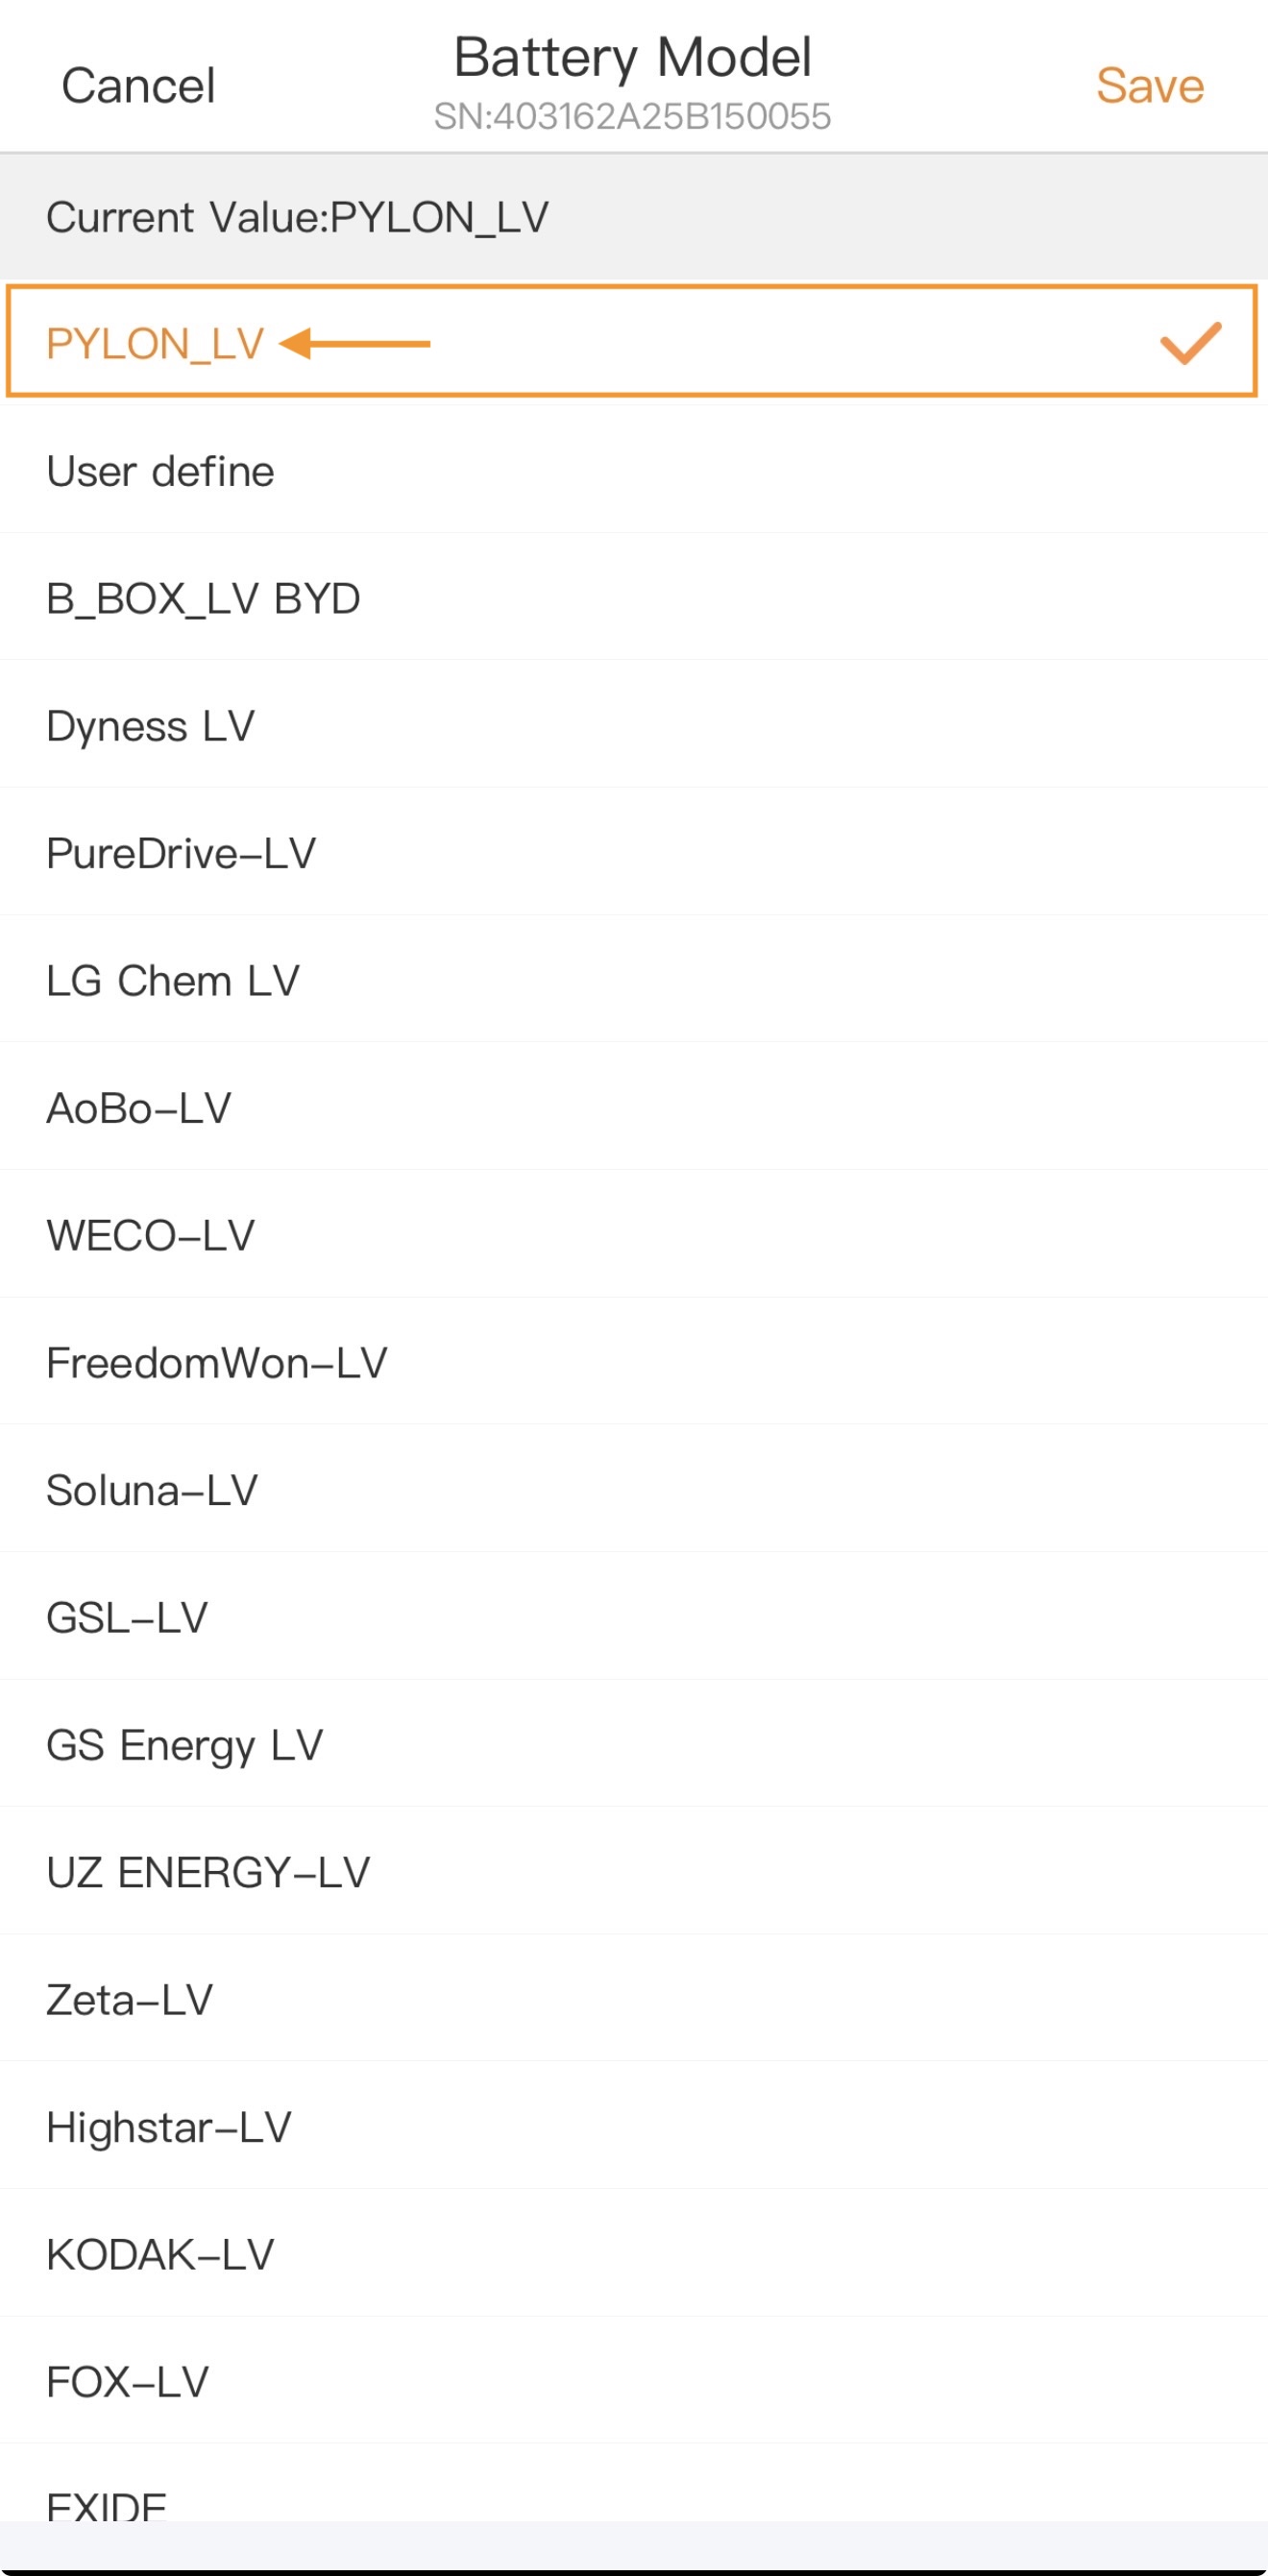
Battery Model: This setting allows you to select the specific CAN protocol/profile.
Your selection will depend upon the battery being connected. Most batteries will use either “PYLON_LV” at the top of the list or the “Lithium Battery LV” at the bottom of the list.
The “Lithium Battery LV” profile correlates with the Solis CAN protocol.
Many batteries such as Discover, HomeGrid, and Pylontech all use the “PYLON_LV” profile.
IMPORTANT: Do not select the profile called “Lithium Battery LV(RS485)”
Be sure to tap Save in the top right corner after making your selection.
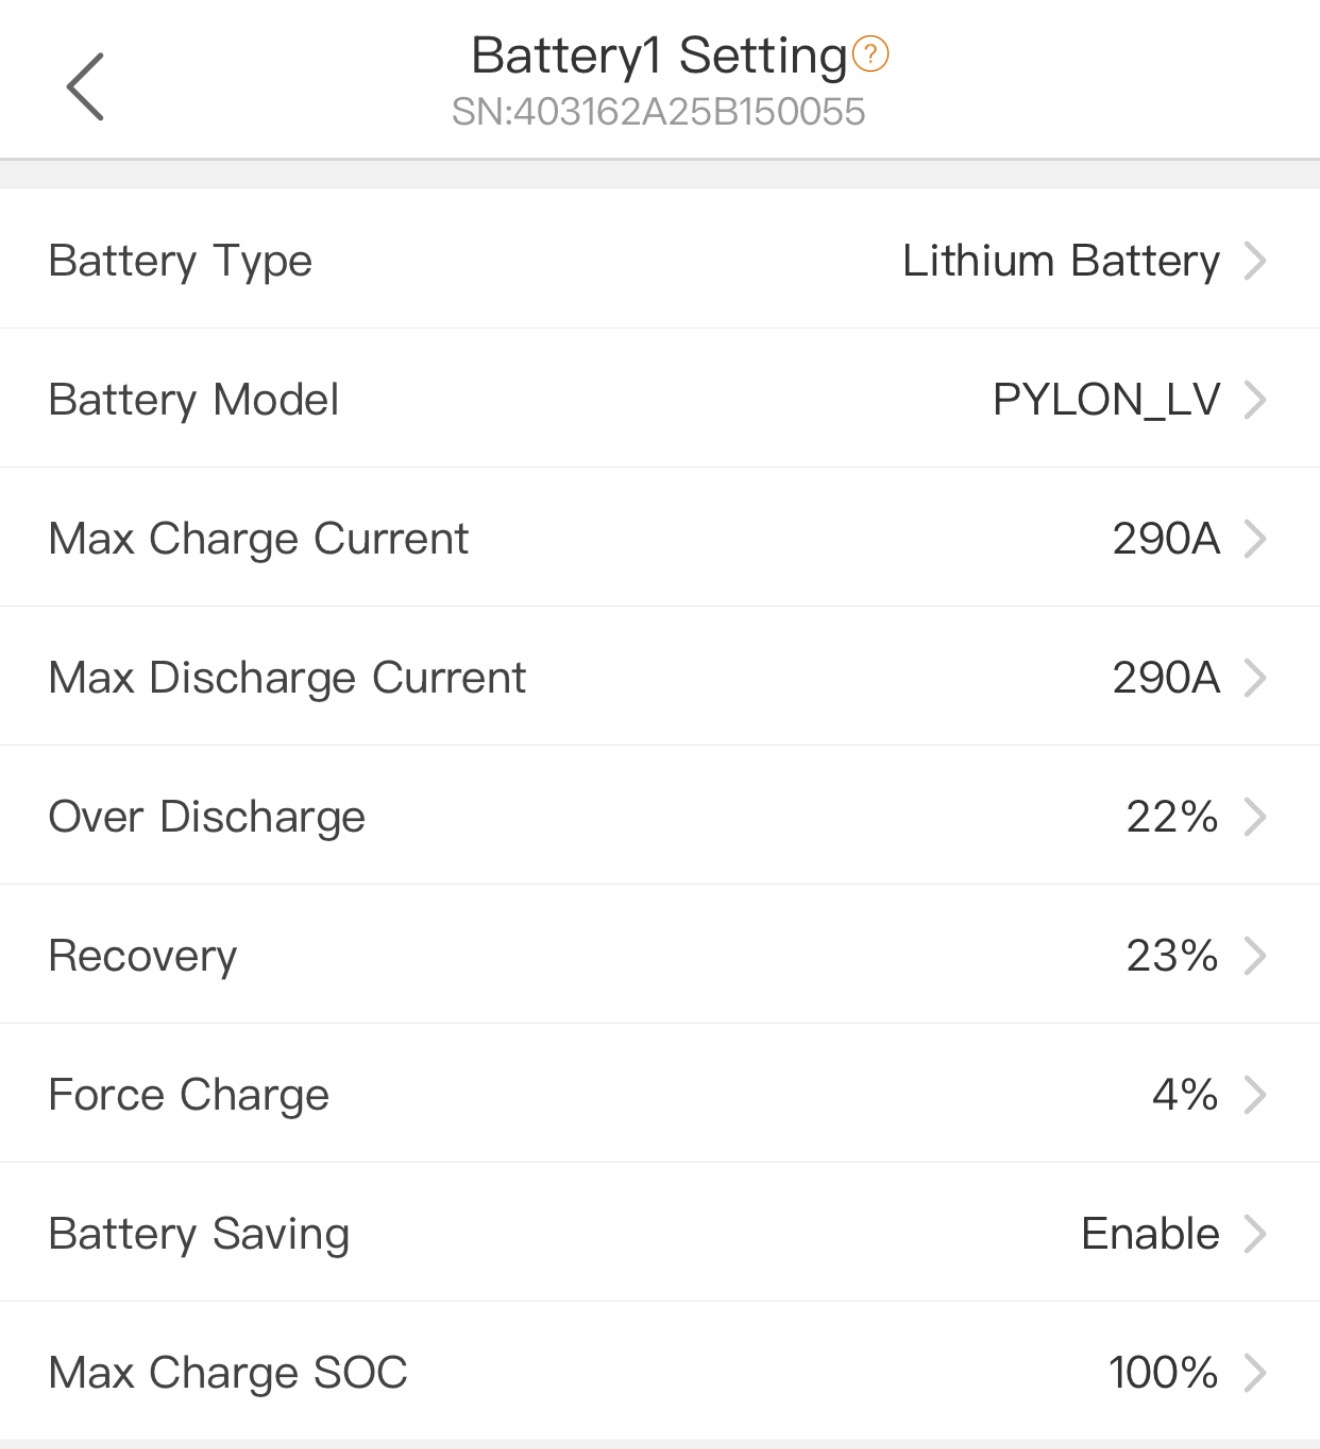
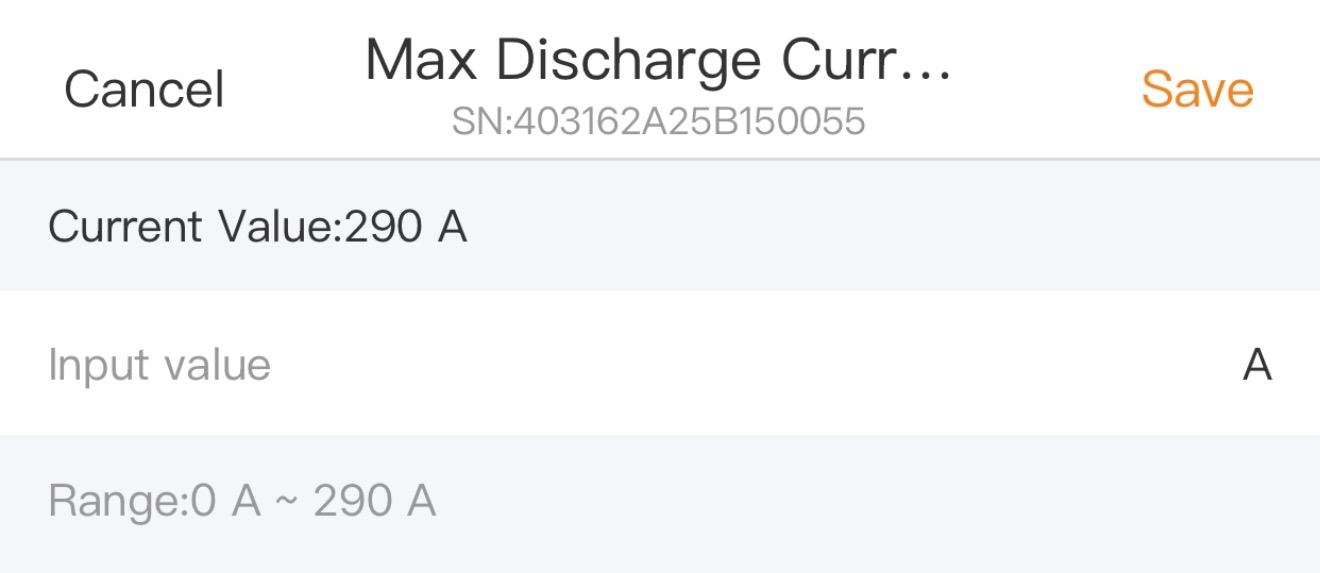
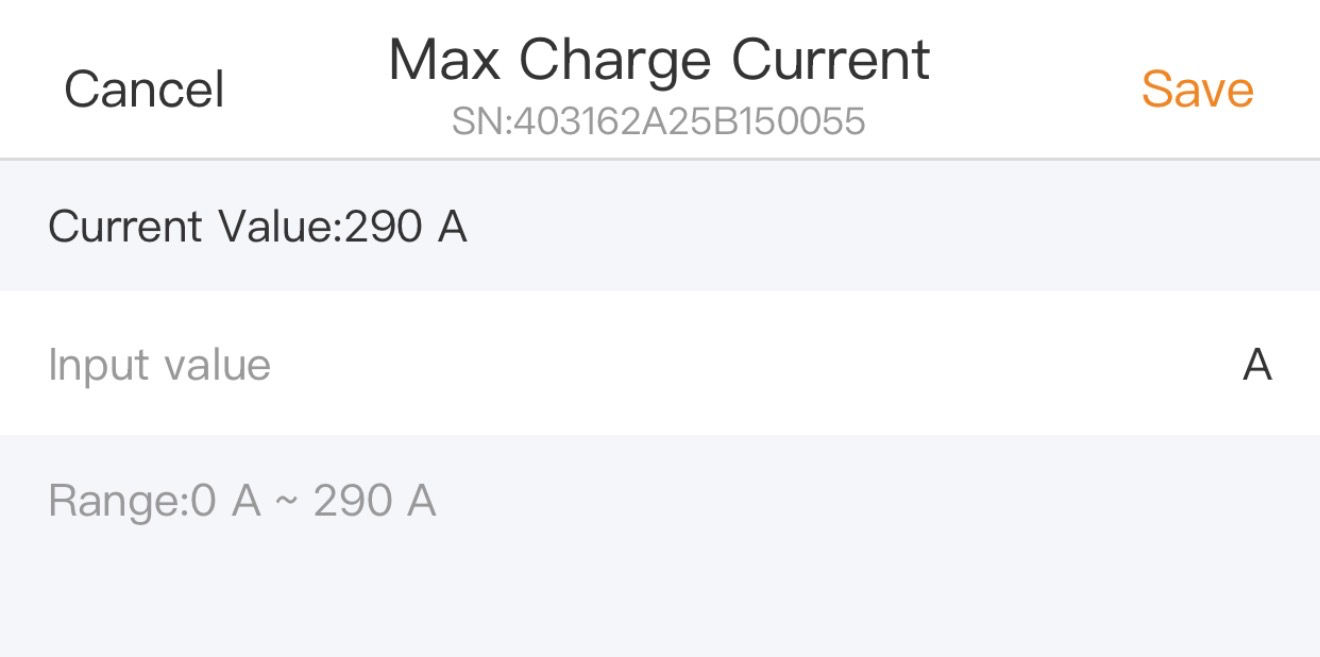
Max. Charge / Discharge Current: While a maximum limit can be set, the closed-loop BMS will dynamically throttle the actual charge and discharge currents based on the real-time health, temperature, and cell balance of the battery pack. Essentially, the BMS dictates the charge curve, not the inverter.
Range: 0A to 290A
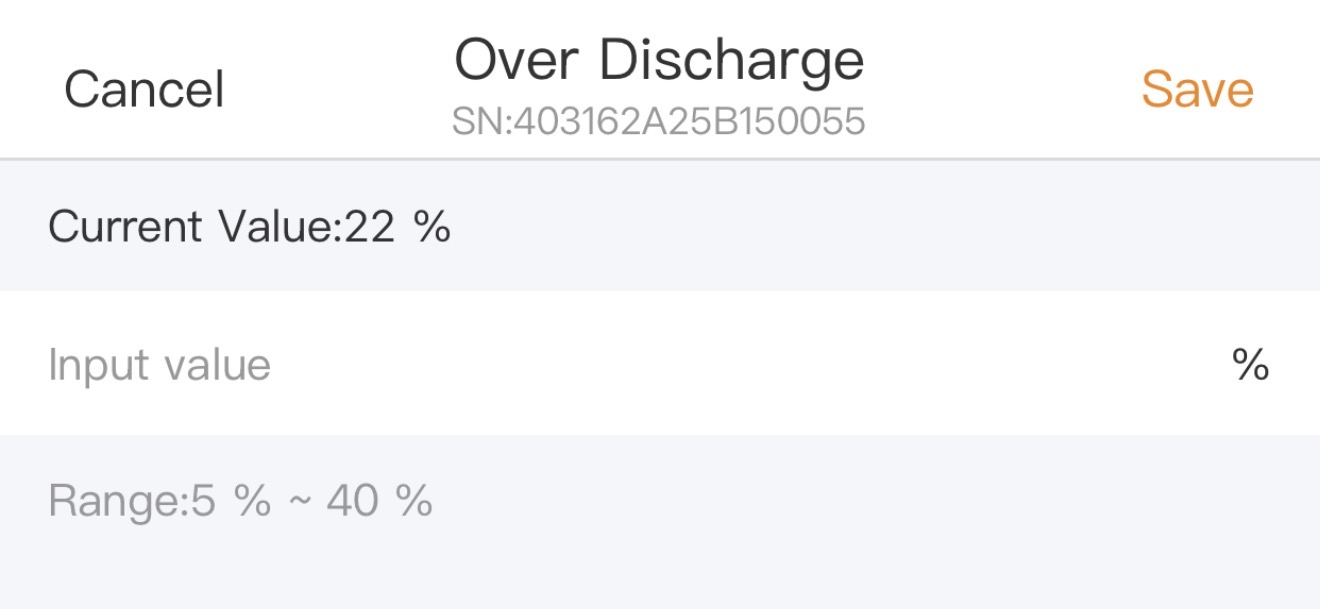
Over Discharge SOC%: The hard-stop minimum percentage where the inverter will cease discharging to protect the battery from depletion.
Range: 5% to 40%
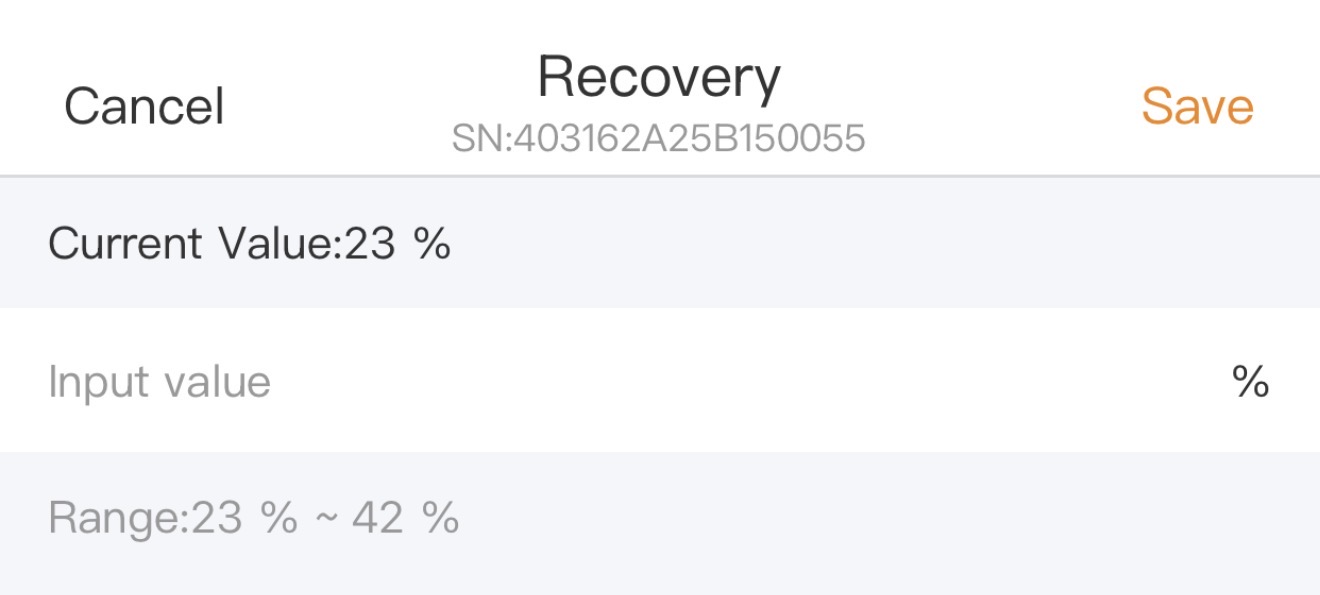
Recovery SOC%: The threshold percentage the battery must recharge to after hitting the over-discharge limit before the inverter will allow it to supply the loads again.
Range: 5% to 42%
Note: range will vary depending upon the Force Charge SOC% since the Recovery SOC% cannot be set lower than the Force Charge SOC%
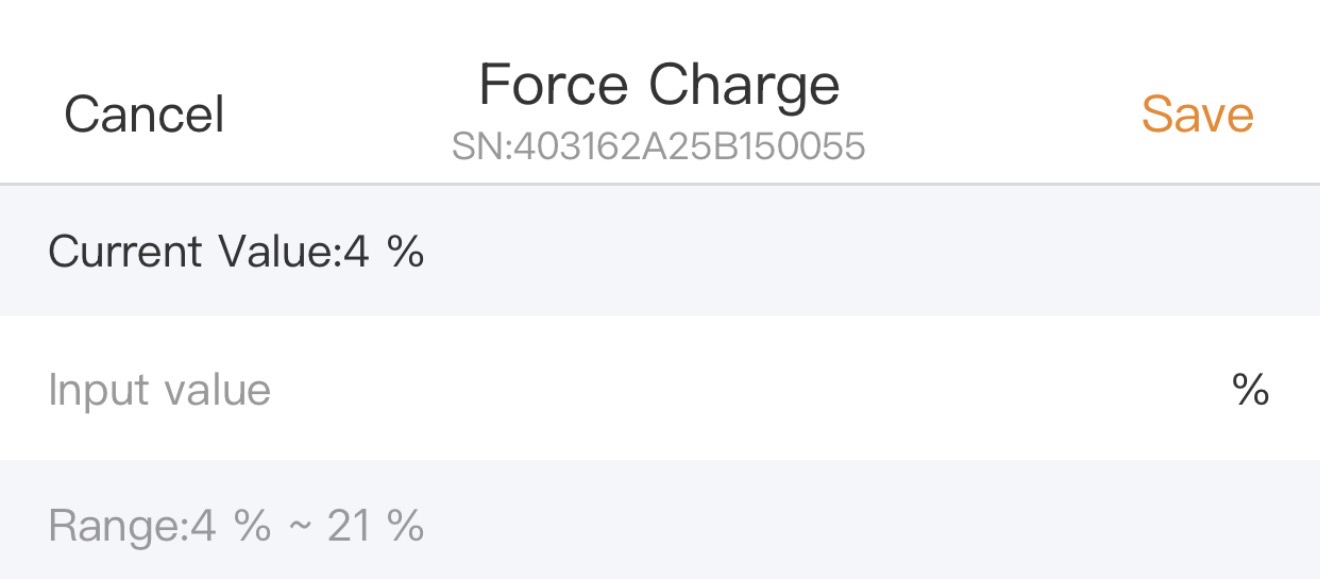
Force Charge SOC%: The critical lower limit where the inverter will forcefully pull power from the grid to charge the battery if PV is not available to prevent irreversible deep-discharge damage to the battery.
Range: 4% to 21%
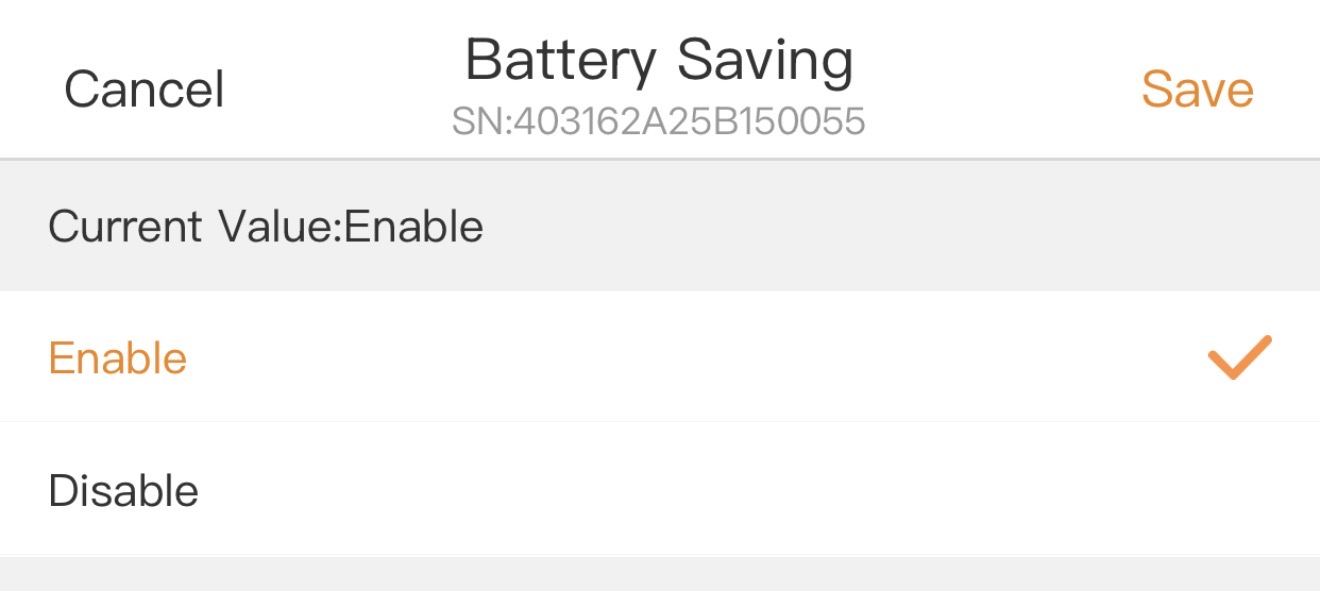
Battery Saving: When enabled, the inverter will import power from the grid to cover its own operating needs instead of pulling that power from the battery.
Range: Enable (on) or Disable (off)
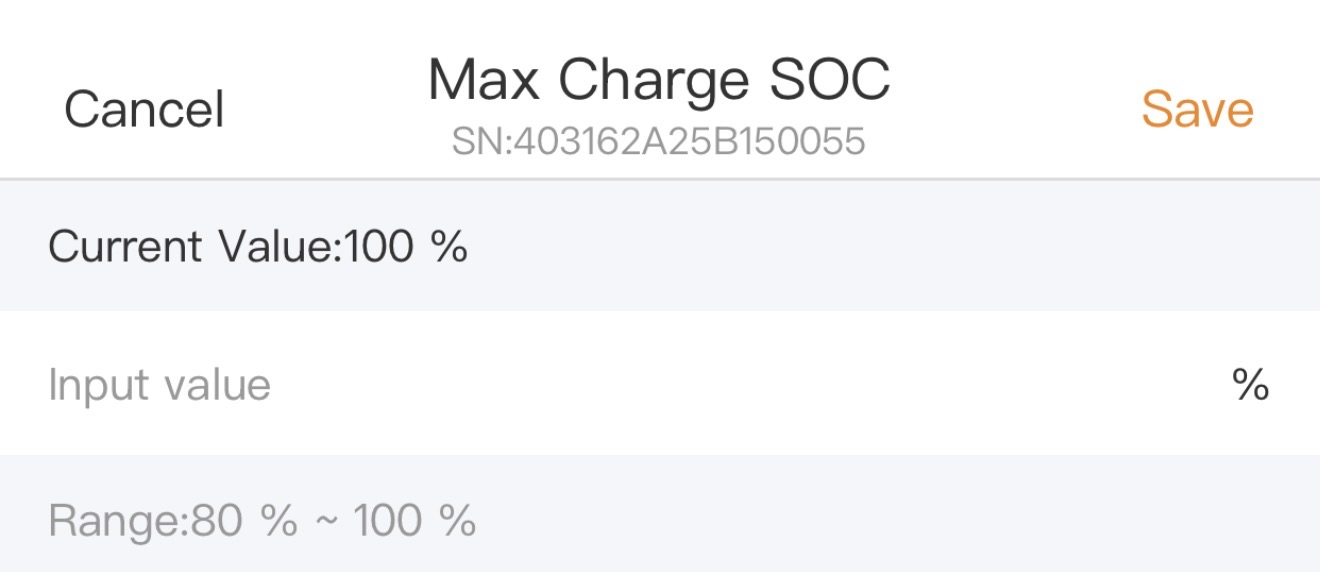
Max. Charge SOC%: This represents the upper limit that the battery is permitted to charge to.
Range: 80% to 100%
2. Battery Open-Loop Settings (No Communication)
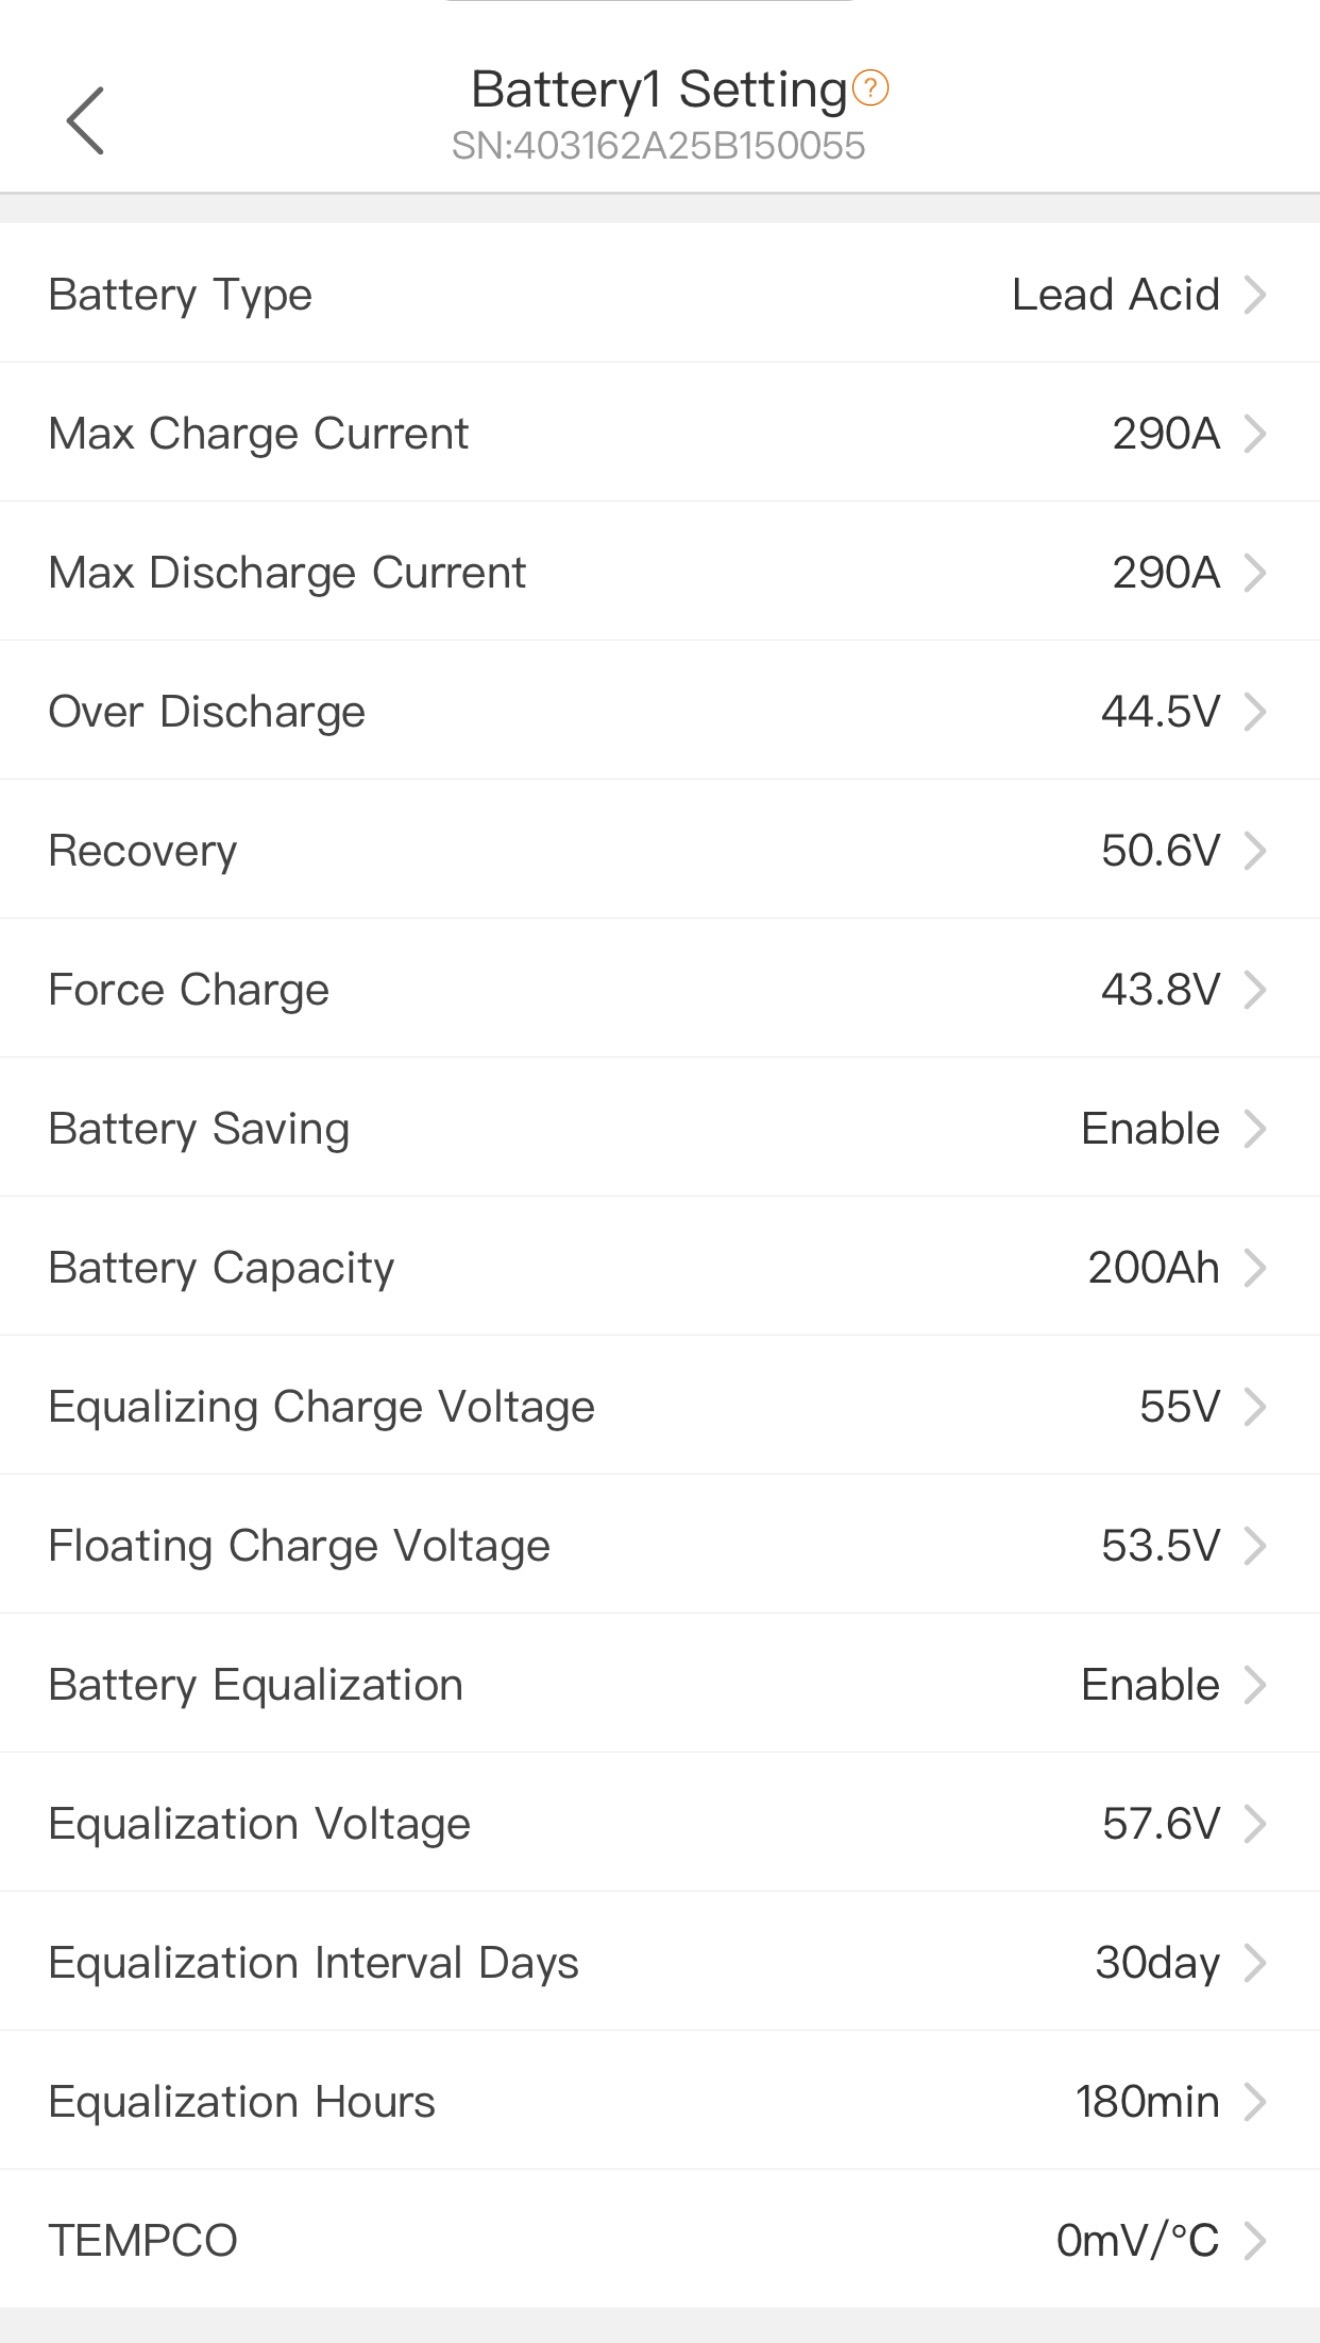
Battery Type & Model: This setting allows you to select the specific battery chemistry and manufacturer. For open-loop batteries select one of the “(Without COMM)” options:
48V Lithium Ion
51.2V Lithium Ion
48V Lead-Acid
Max. Charge and Discharge Current: This configures the maximum current the battery is allowed to charge and discharge with.
Range: 0A to 290A
Over Discharge Voltage: This dictates the specific point at which the battery will stop discharging.
Range: 0A to 290A
Recovery Voltage: This is the threshold at which the inverter allows the battery to be used again after reaching an over-discharged state.
Range: 49V to 54V
Force Charge Voltage: This acts as a panic mode threshold where the inverter forces power into the battery from any available source to prevent damage from deep discharging.
Range: 44V to 50V
Battery Saving: When enabled, the inverter will import power from the grid to cover its own operating needs instead of pulling that power from the battery.
Range: Enable/Disable
Battery Capacity: This parameter configures the capacity of the battery in amp-hours (Ah).
Range: 0Ah to 9999Ah
Equalizing Charge Voltage: Also known as absorption voltage, this determines the maximum charge voltage the inverter allows before switching from pushing current to holding voltage.
Range: 40V to 60V
Floating Charge Voltage (Lead-Acid): This is a constant maintenance voltage applied after charging is complete to offset self-discharge.
Range: 40V to 60V
Battery Equalization (Lead-Acid): This includes settings to enable the equalization process, set the Equalization Voltage, and configure the Equalization Interval Days and Hours.
Enable/Disable
TEMPCO (Lead-Acid): This setting tells the inverter how much to dynamically shift the charging voltage as the battery temperature fluctuates.
Range: 0mV/°C to 180mV/°C
3. Additional Battery Settings
3A. Function Settings
Location: Professional Setting > Function Setting > Function Setting
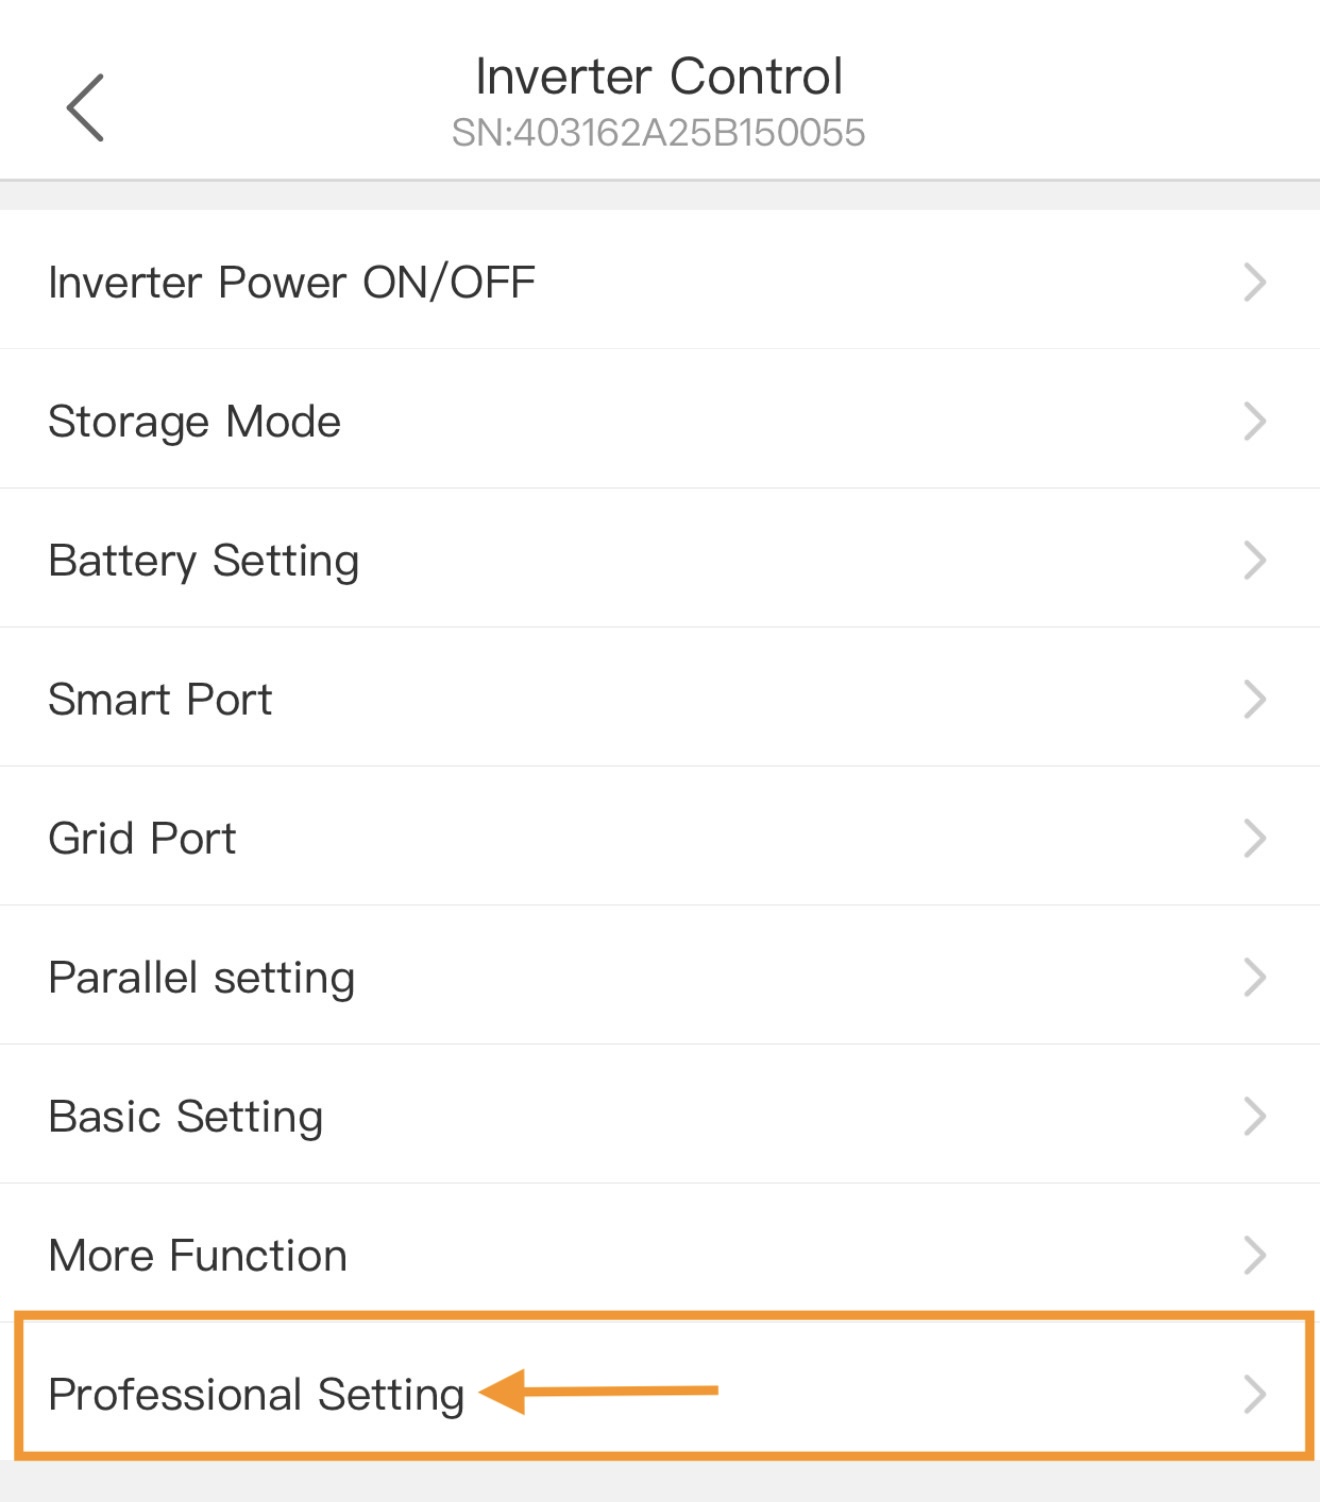
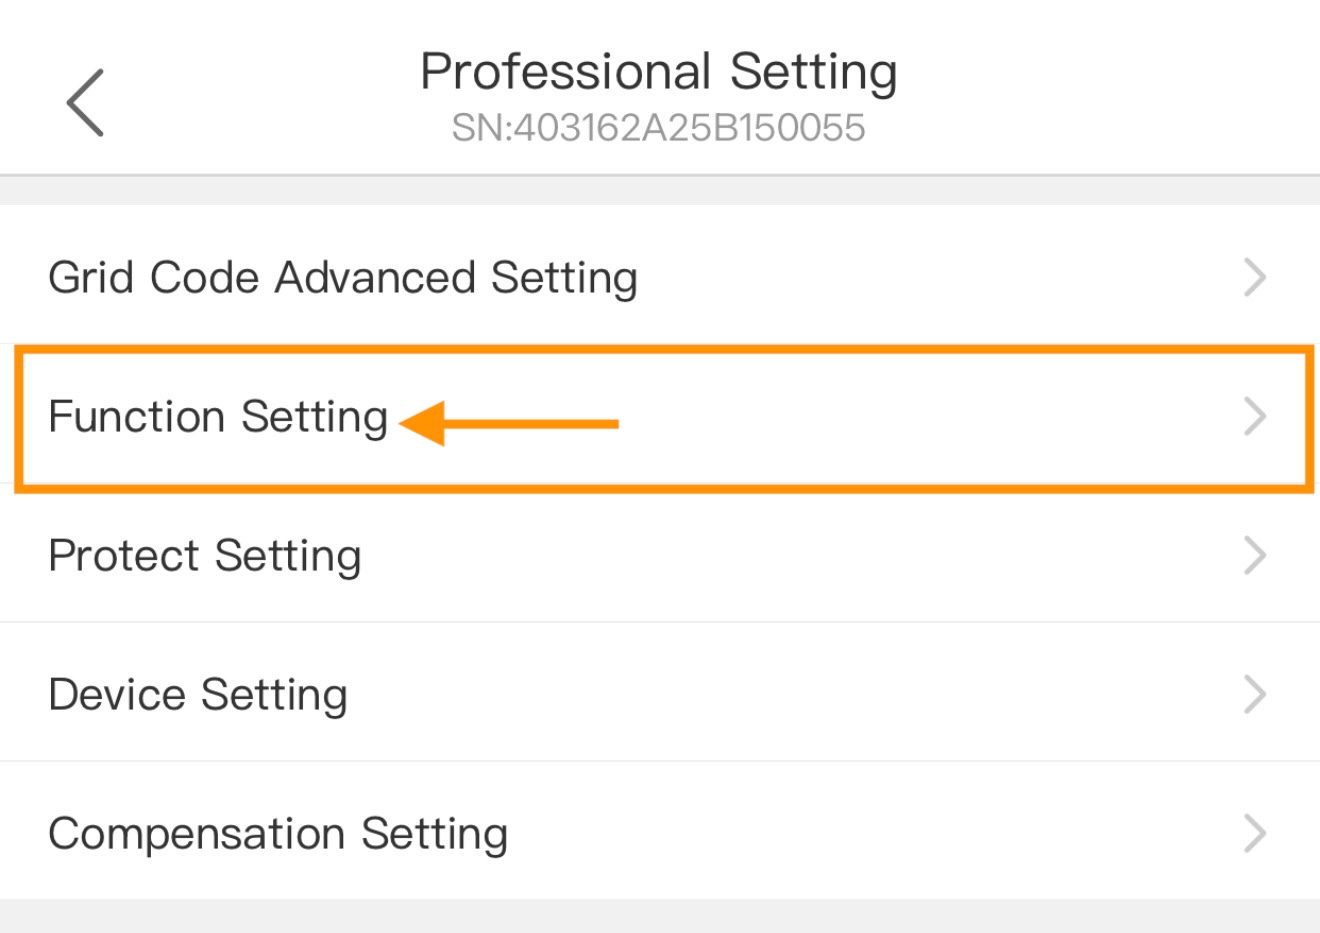
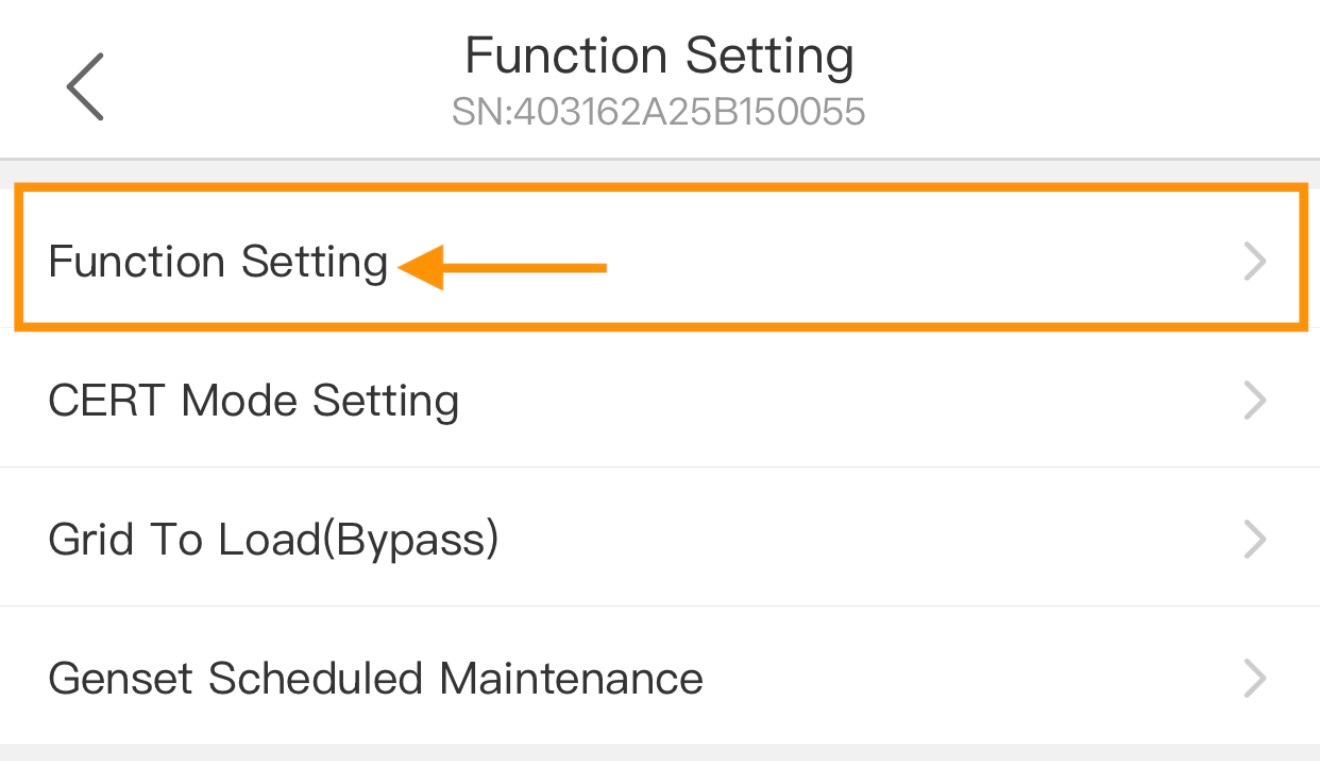
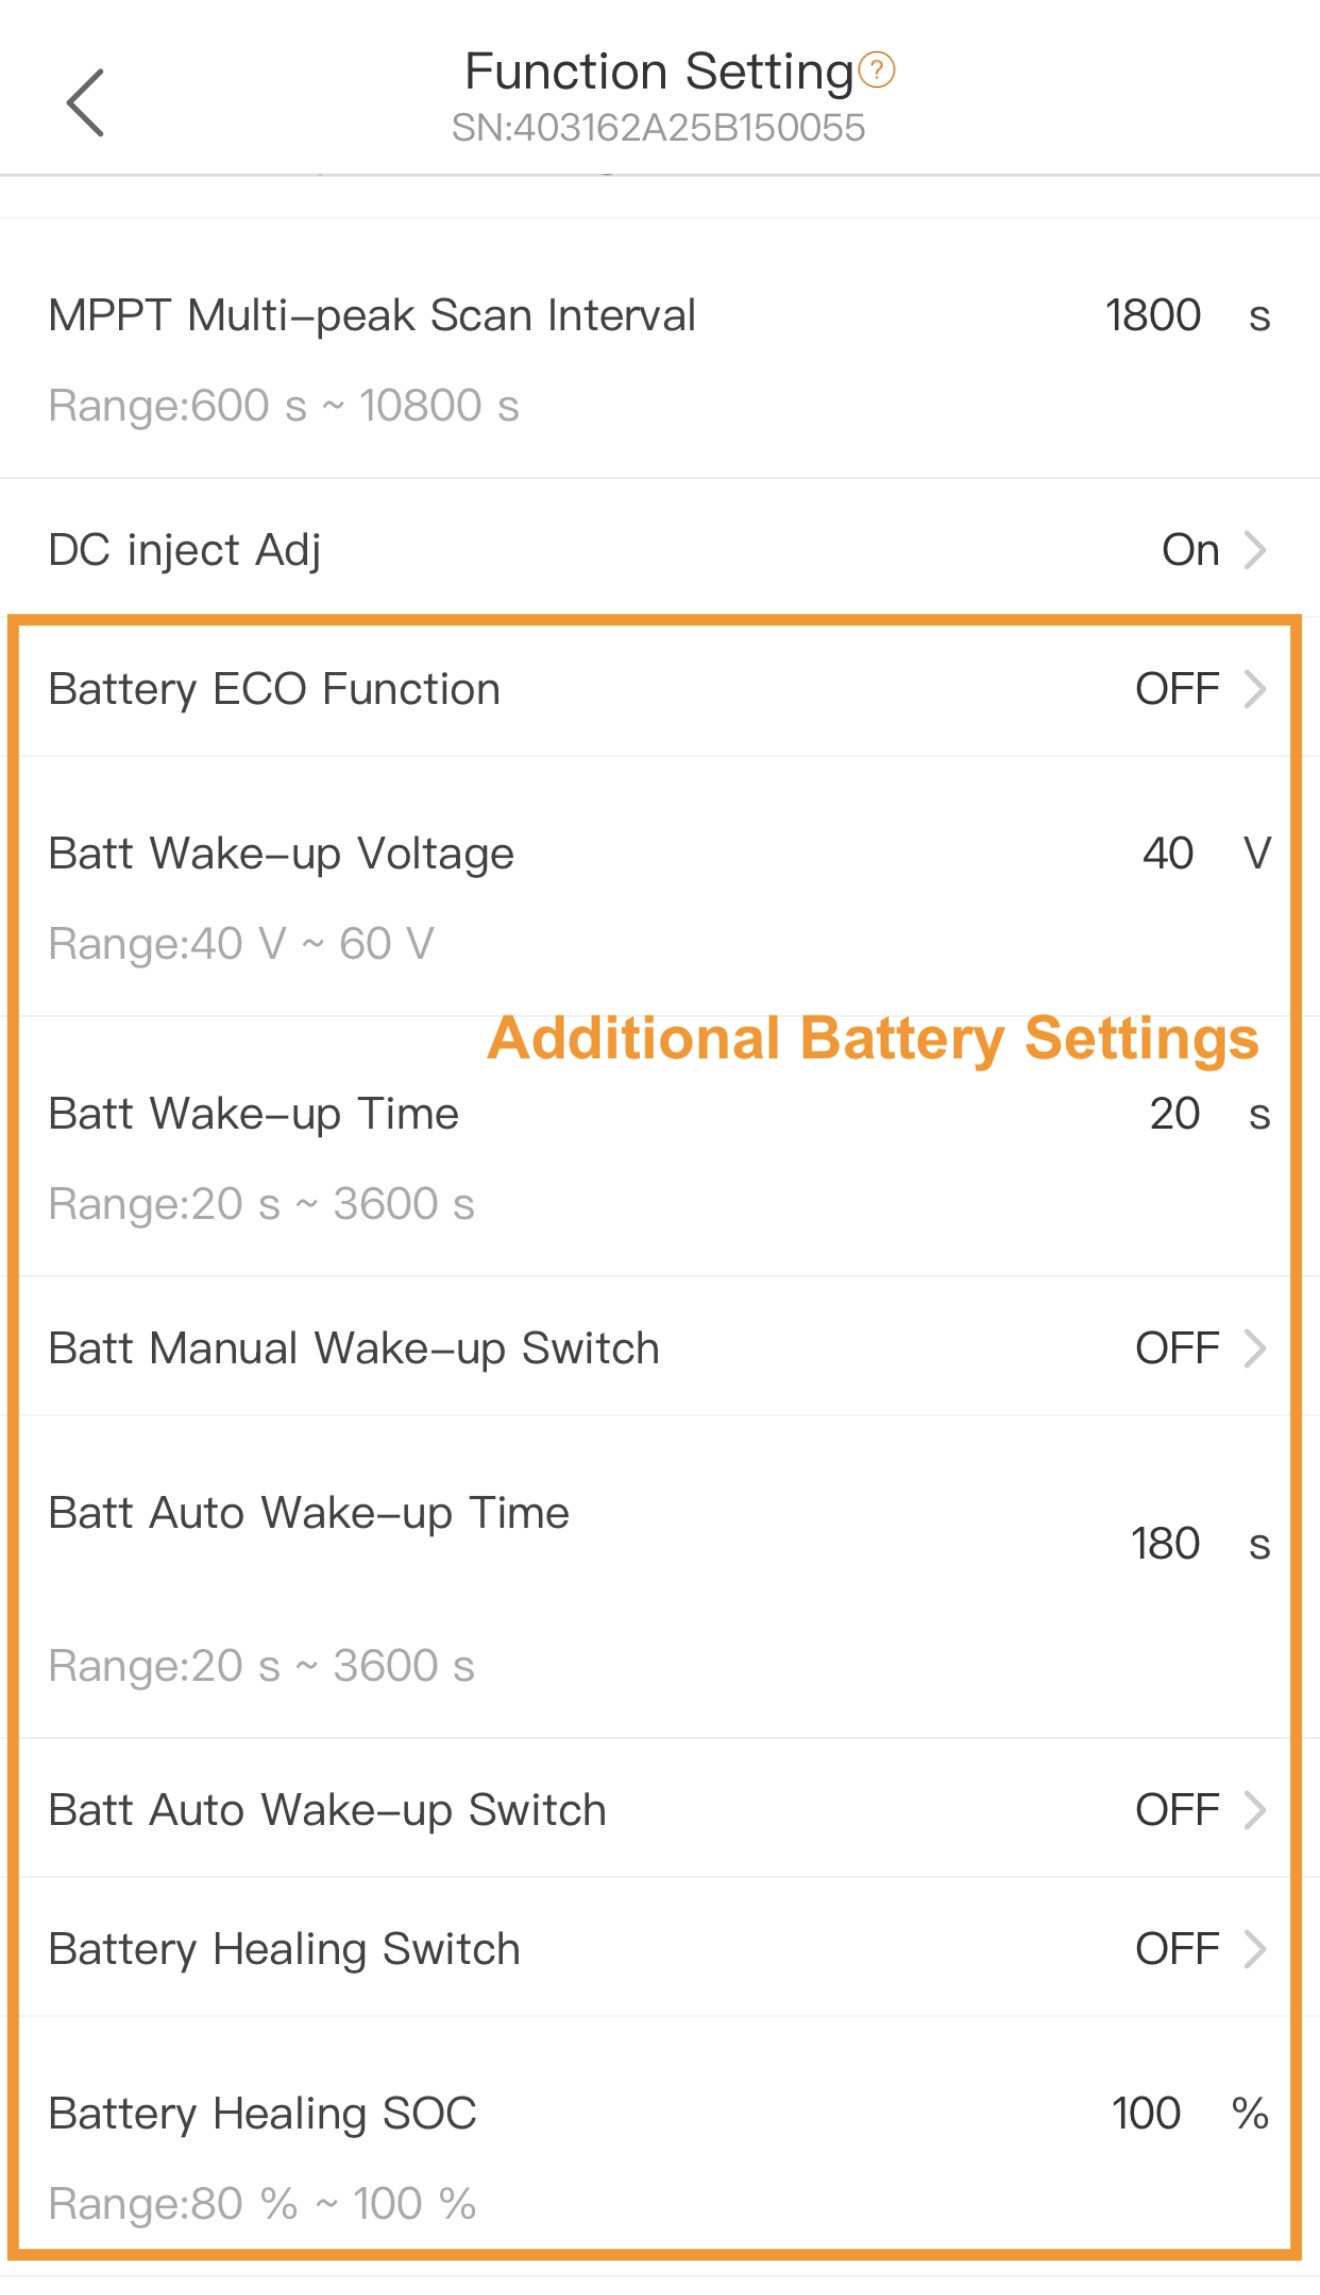
- Battery ECO Function: Reduces system power consumption during prolonged periods of low activity.
- Range: ON/OFF
- Default: OFF
- Batt Wake-up Voltage: Defines the specific voltage applied to wake up a deeply depleted lithium battery BMS.
- Range: 40V to 60V
- Default: 40V
- Batt Wake-up Time: Specifies the duration the wake-up voltage is applied to a deeply depleted lithium battery BMS.
- Range: 20 seconds to 3,600 seconds
- Default: 20 seconds
- Batt Manual Wake-up Switch: Provides a toggle to initiate the battery wake-up process manually or automatically on a schedule.
- Range: ON/OFF
- Default: OFF
- Batt Auto Wake-up Time: Specifies the time parameters for automated attempts to wake the battery manually or automatically on a schedule.
- Range: 20 seconds to 3,600 seconds
- Default: 180 seconds
- Batt Auto Wake-up Switch: Enables the system to trigger the battery wake-up sequence manually or automatically on a schedule.
- Range: ON/OFF
- Default: OFF
- Battery Healing Switch: Toggles the battery healing or equalization mode, which can be run manually or automatically on a schedule.
- Range: ON/OFF
- Default: OFF
- Battery Healing SOC: Sets the target State of Charge (SOC) limit during maintenance cycles for specific battery chemistries to recalibrate SOC.
- Range: 80% to 100%
- Default: 80%
- Baseline SOC%: This is the battery's anchor point. It is the initial "we are exactly here" value that the battery management system (BMS) uses before it starts doing the complicated math of tracking energy going in and out. This setting does not need to be modified under most circumstances. Lithium Iron Phosphate (LFP) batteries are generally shipped from the factory at roughly 50% to 70% state of charge for chemical stability. When an inverter powers up for the first time, it might not immediately receive data from the battery. The 70% default is a safe "dummy" value. It prevents the inverter from panicking—it won't instantly demand a massive charge current thinking the battery is dead, nor will it trigger low-voltage disconnects before communication is fully established.
3B. Smart Port Settings (Generator)
Location: Smart Port > Genset Input
Note: These settings are only relevant if you are installing a generator
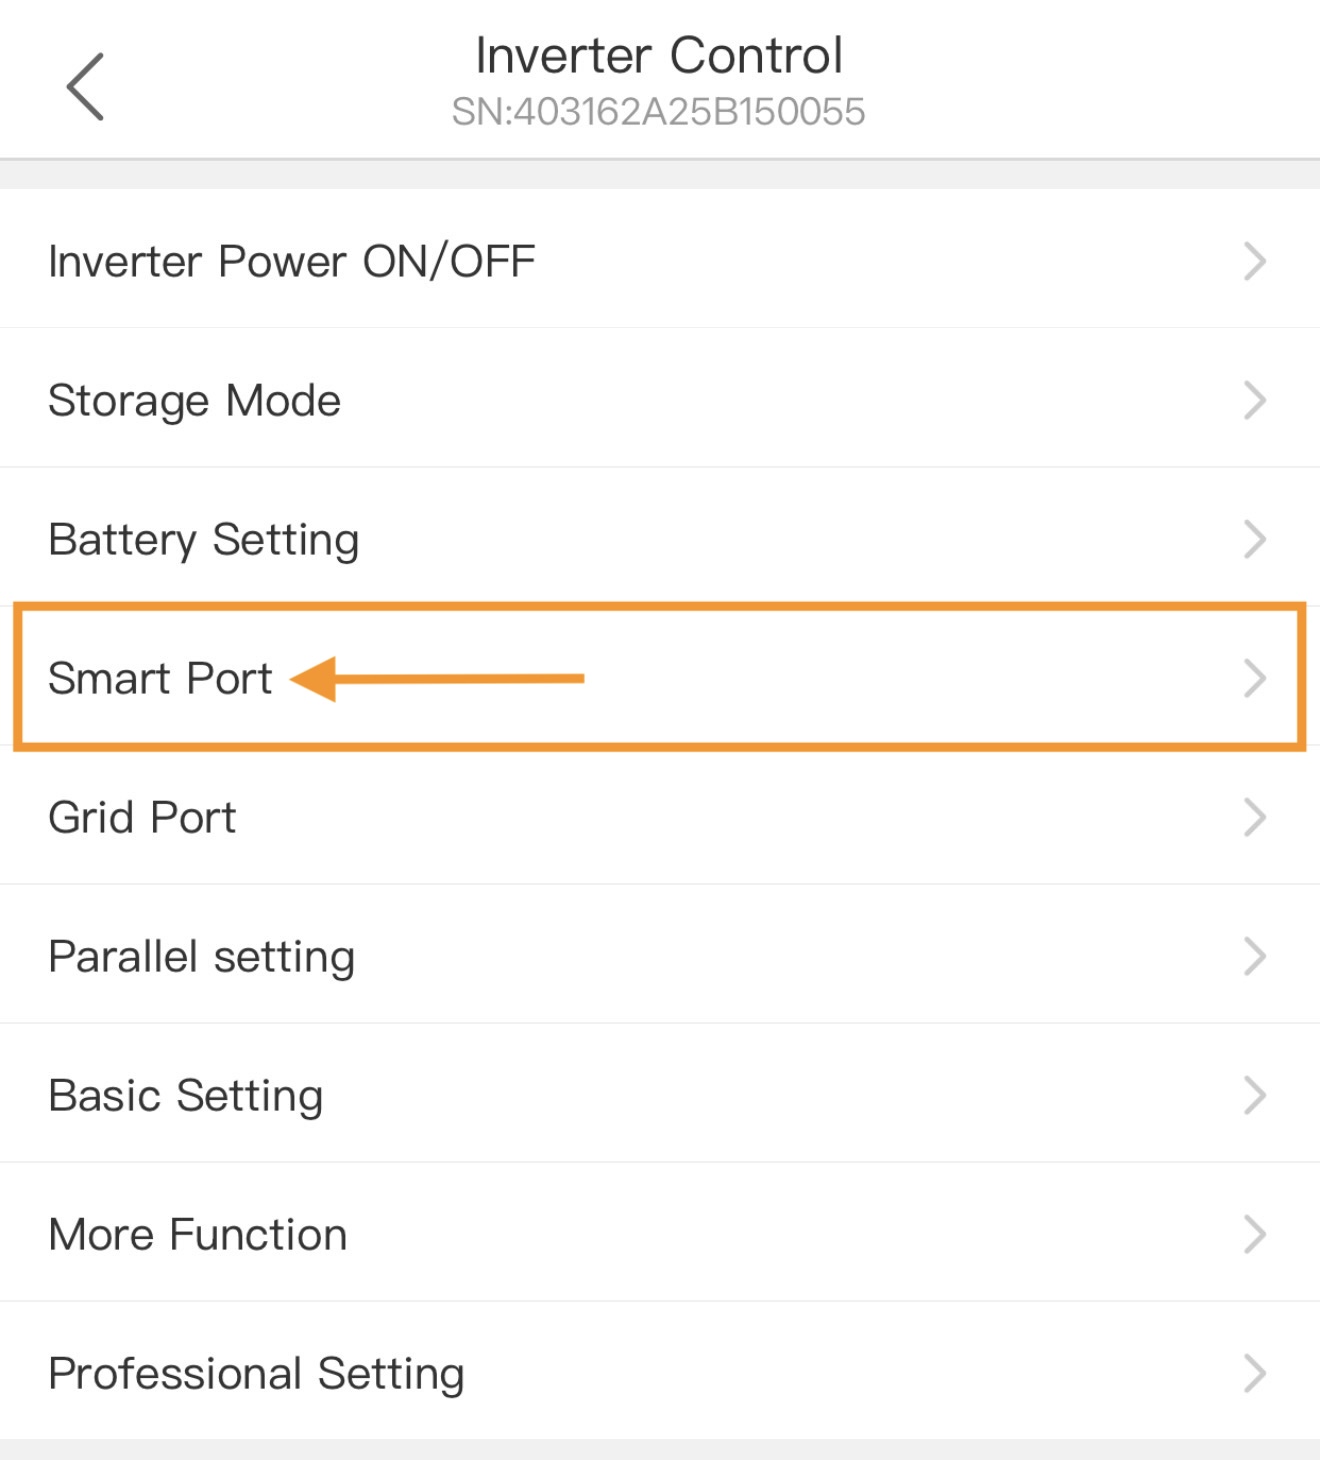
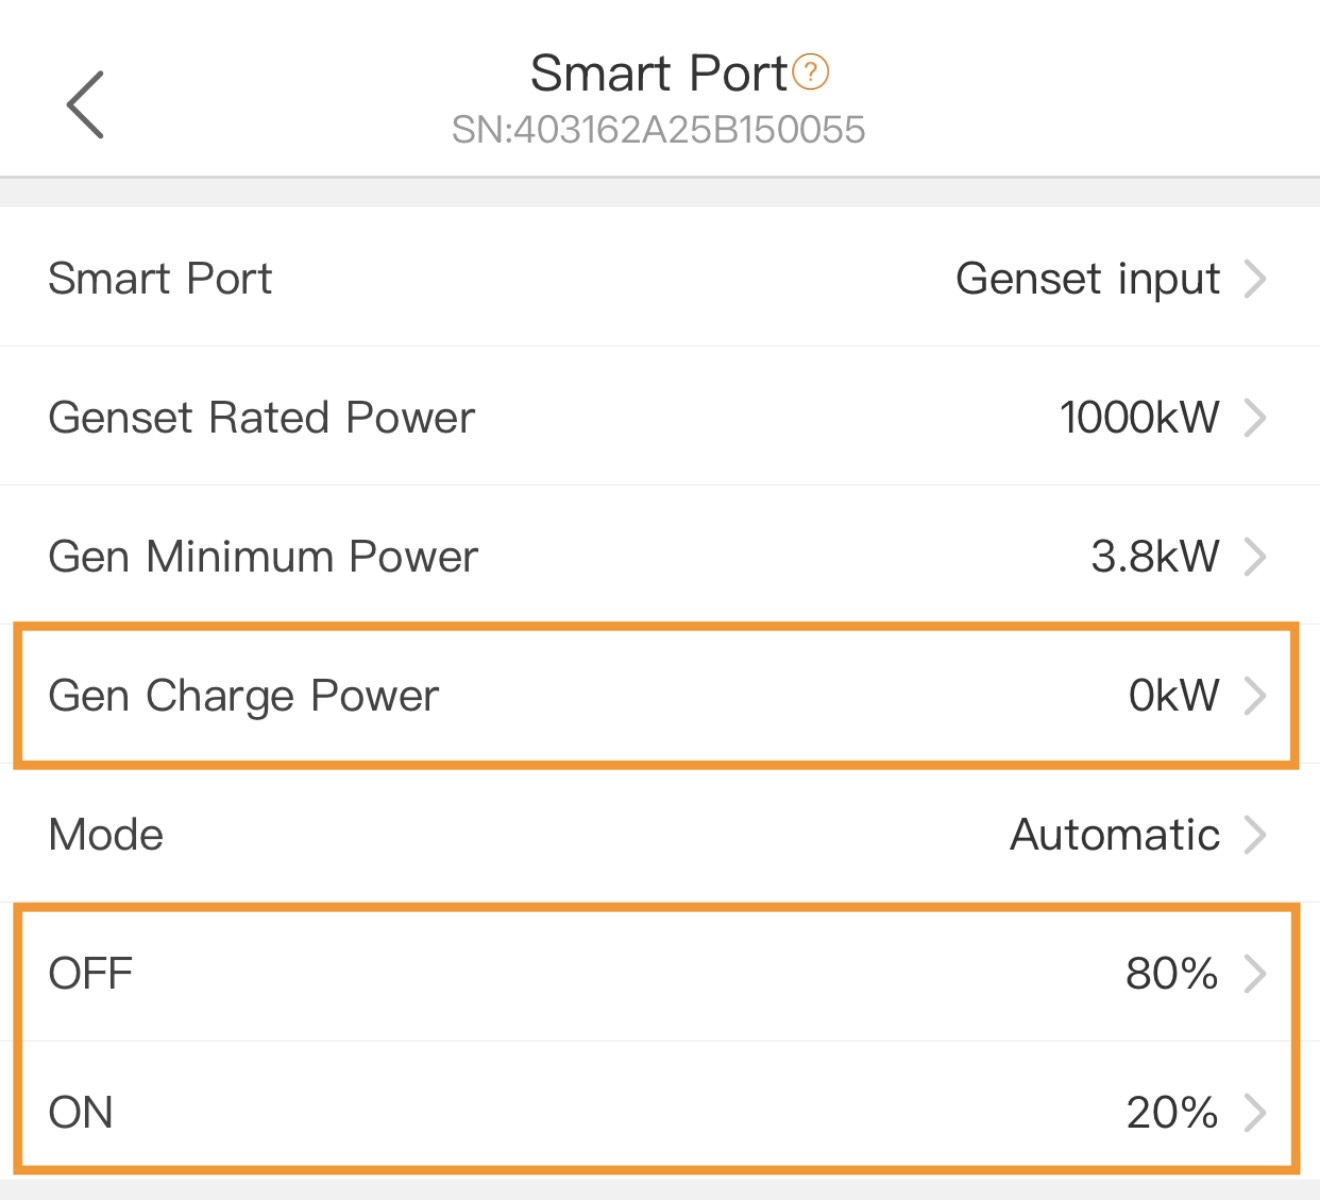
- GEN Charge Power: Defines the maximum amount of power from the generator allocated specifically to charge the batteries. At 0kW, the generator will only supply power to the active loads and will not route any excess power into the battery bank.
- Range: 0 kW to 16 kW
- Default: 0 kW
- ON/OFF SOC% (Generator Start/Stop): Establish the State of Charge (SOC) thresholds that dictate when the inverter's 2-wire dry contact will automatically cycle a connected generator during off-grid or backup operation.Once running, the generator will continue to operate until the battery reaches the high-limit recovery threshold defined by the OFF setting (currently 80%), at which point the inverter commands the generator to shut down.
- Range: 0% to 100%
- Default: 0N=20% OFF=80%
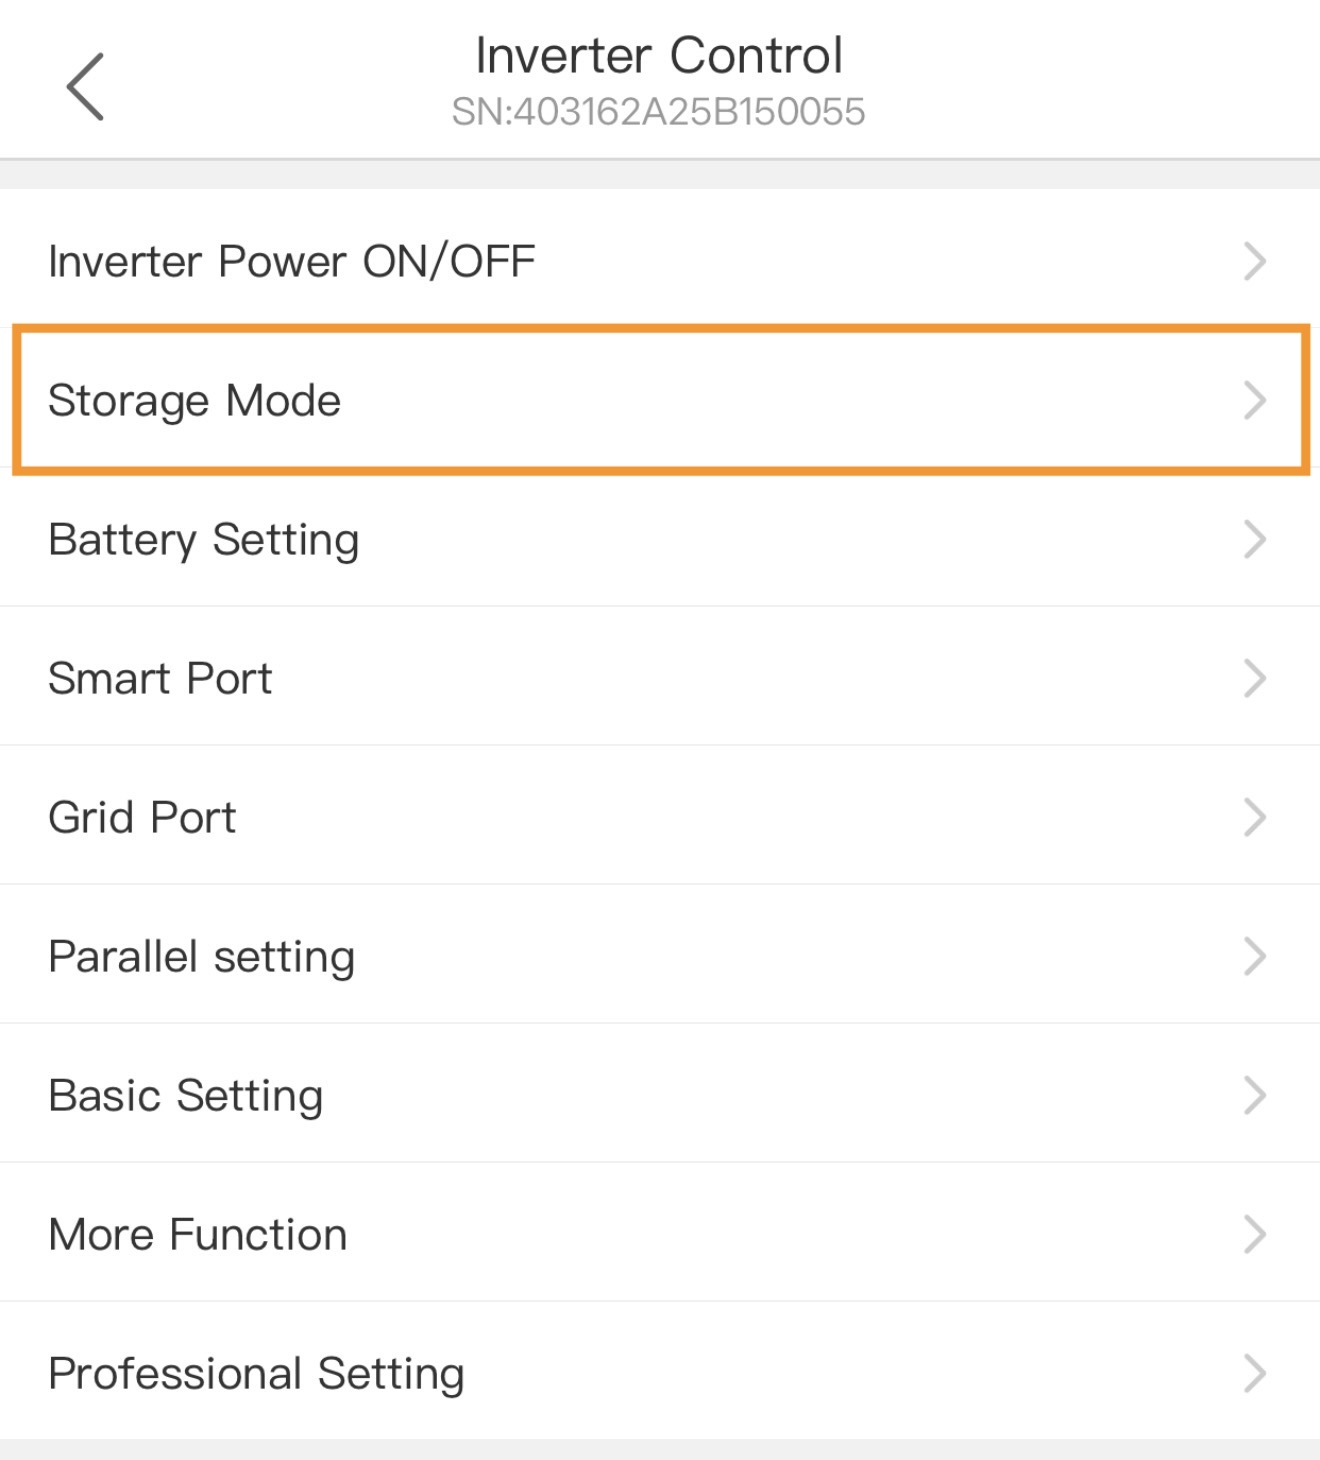
3C. Storage Mode Settings
Location: Storage Mode Setting > Self-Use/Selling-First Modes
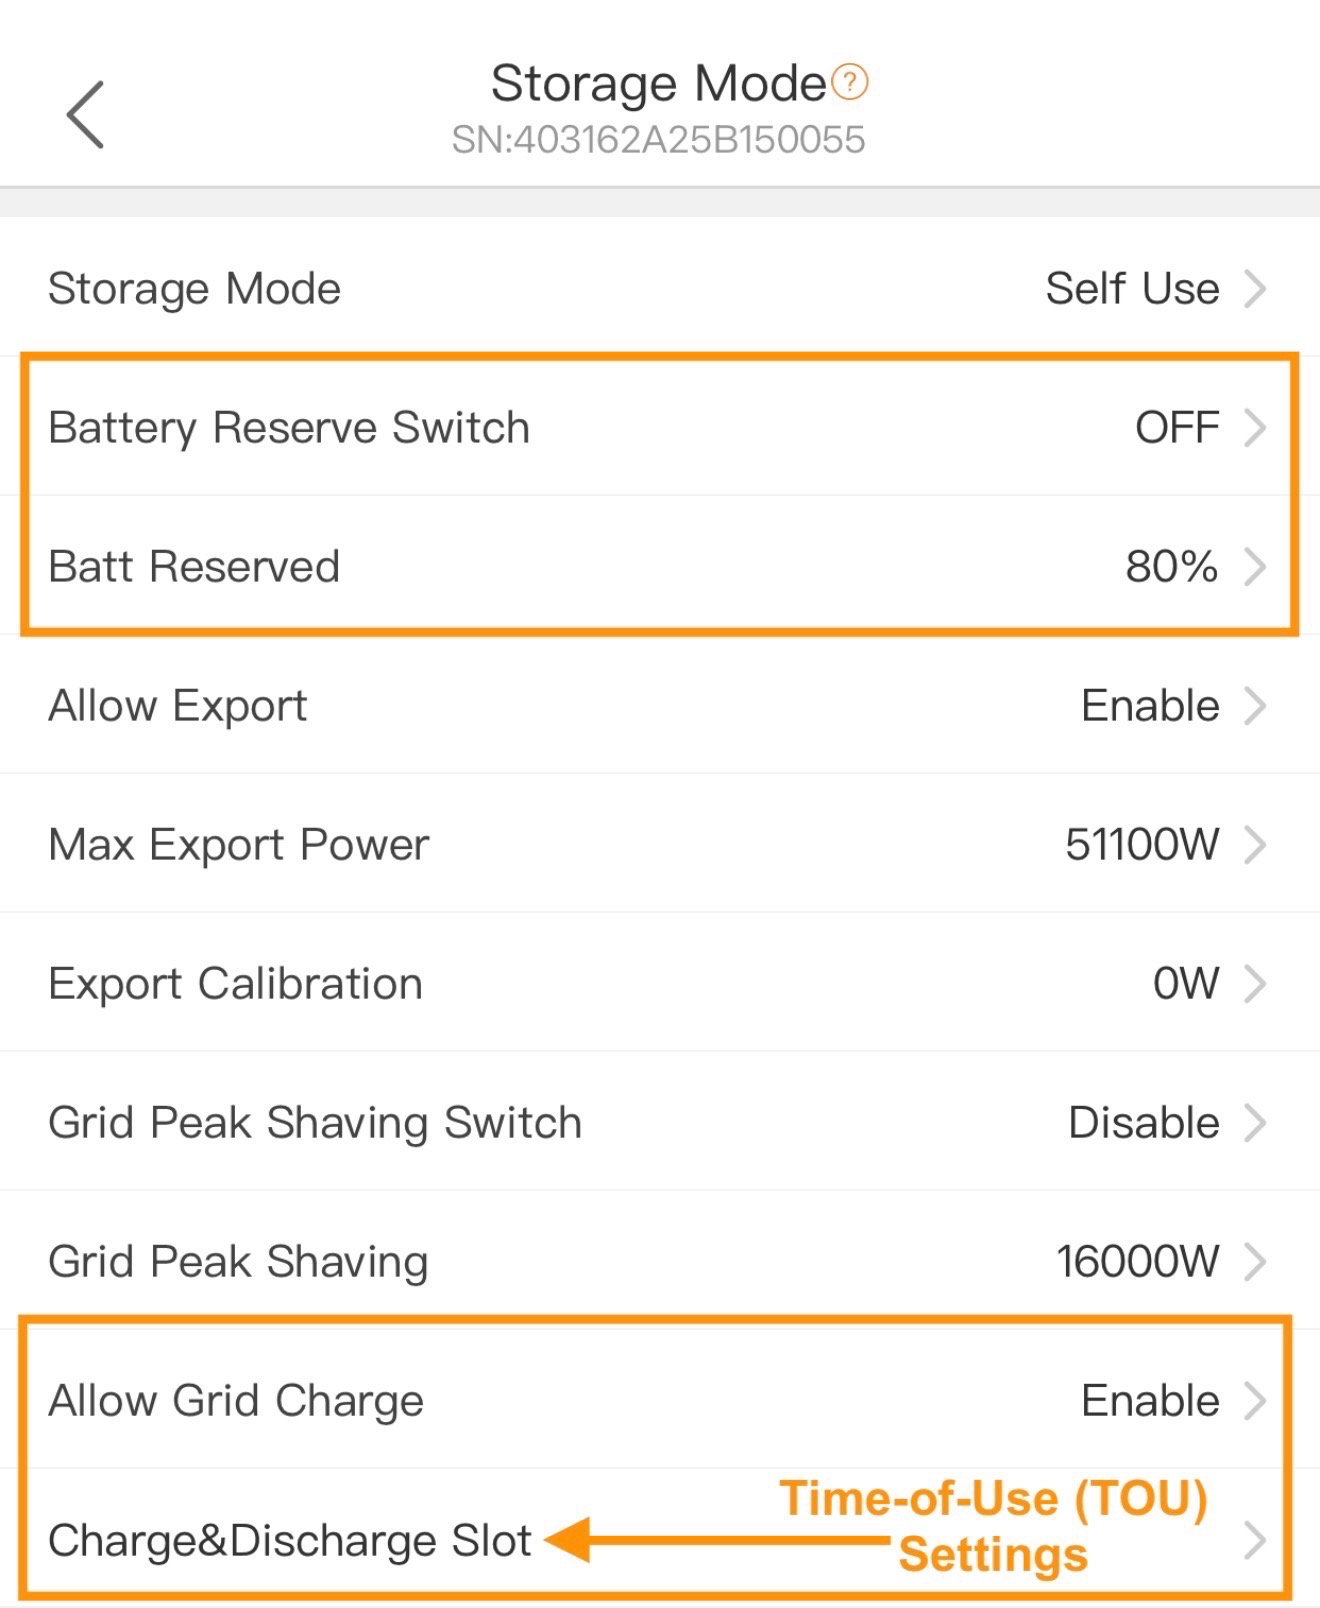
- Battery Reserve Switch: Stored battery energy that will only be dispatched during a power outage (backup) event. If your goal is to maintain a store of energy in the battery that can only be used if the grid fails, set this to ON. If your goal is to cycle the battery daily for energy arbitrage, then keep this set to OFF or set it to ON but keep the Batt Reserved SOC% low.
- Range: ON/OFF
- Default: OFF
- Batt Reserved: State-of-charge (SOC) percentage of the battery that will be stored and kept for use only in a backup scenario. This is an on-grid normal operation discharge limit. The inverter will only discharge below this limit when in backup mode.
- Range: 5% to 100% SOC
- Default: 80%
- Allow Grid Charge: Determines whether or not the inverter will permit power to be exported to the utility. For zero export, this should be set to Disable. For maximum and controlled export, this should be set to Enable. This setting correlates with the "Max. Export Power" setting when set to Enable.
- Range: Enable/Disable
- Default: Enable
- Charge&Discharge Slot: Time-of-Use (TOU) scheduling parameters that define specific time windows and power amounts in DC amperage for forcing the battery to charge or discharge. TOU settings will be explained in more detail in the next section Energy Storage Mode Settings.
4. Energy Storage Mode Settings
4A. Time-of-Use Settings
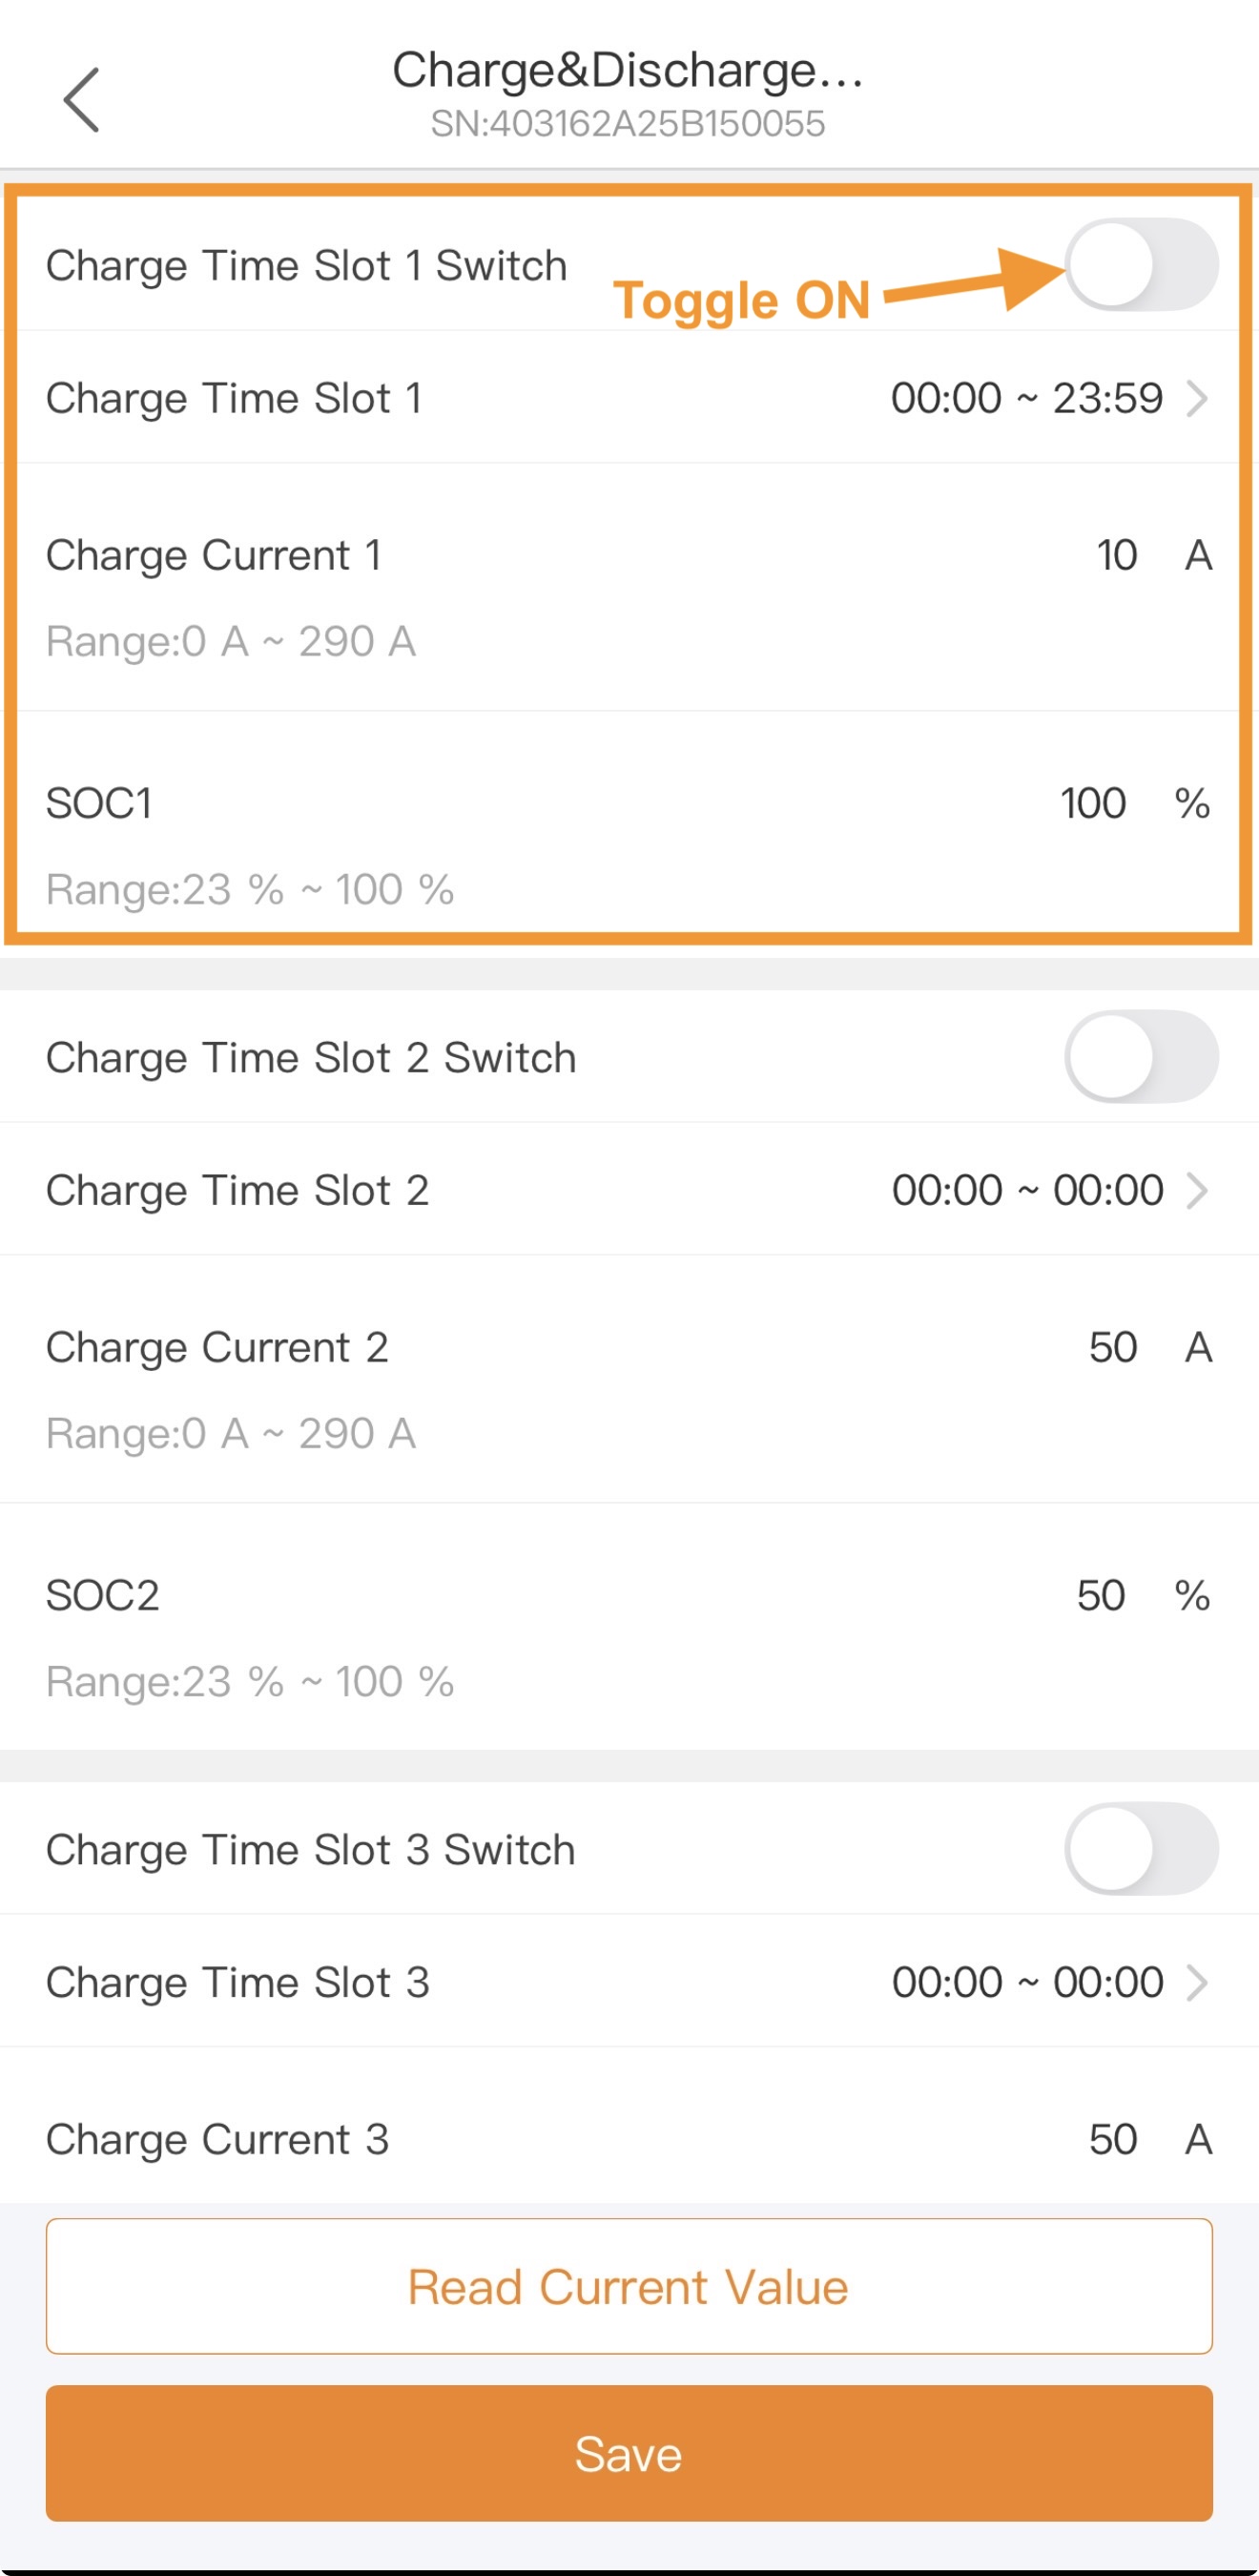
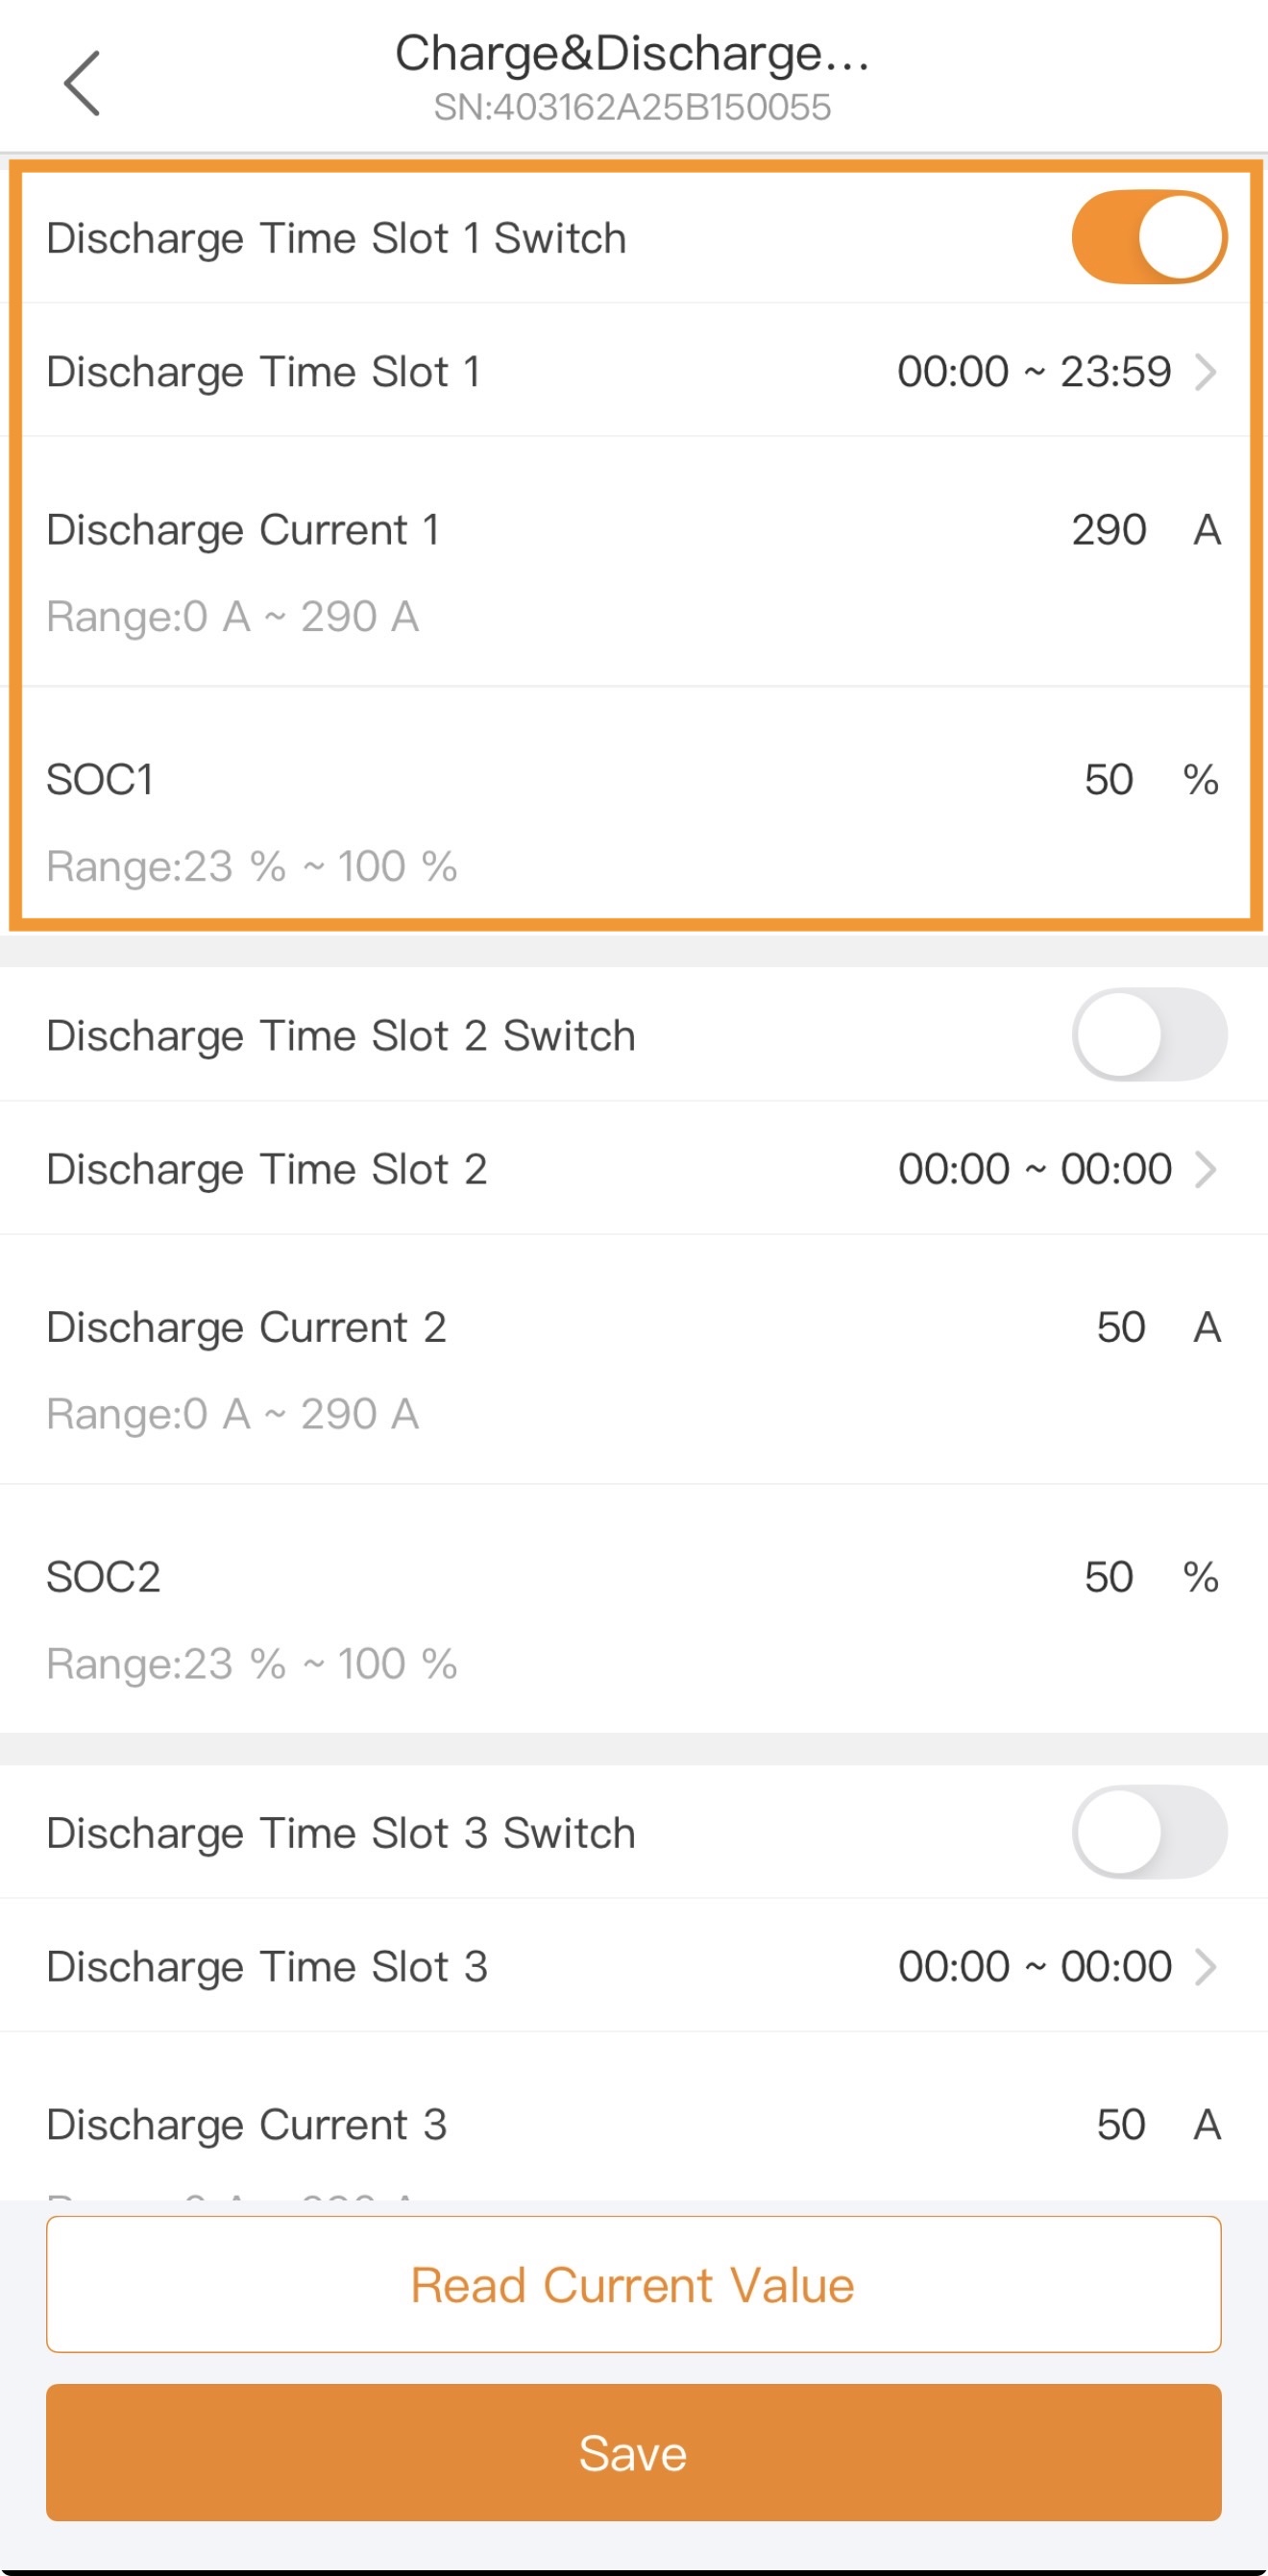
- Tap on Charge&Discharge Slot. There are multiple slots for both charging and discharging.
- Charge/Discharge Time Slot 1 Switch: Toggle this switch on to enable a scheduled charge/discharge time window. Leaving this toggled off means the system will run in default self-use mode.
- Charge/Discharge Time Slot 1: The time during which the battery will be forced to take a charge from either PV or grid, whichever is available. It will always prioritize PV charging but if there is not enough PV available then it will use grid power to charge in this mode if Allow Grid Charge is enabled. If it is set for discharging then the inverter will try to discharge the battery at the set Discharge Current Limit 1. If there is not enough load demand to consume the discharged battery power, the remaining power will be exported to the grid if the Allow Export setting is enabled.
- Range: 00:00 to 23:59
- Charge/Discharge Current 1: The rate at which the battery will charge during the set time window. If the setting Allow Grid Charge is enabled then the inverter will supplement with grid power if there is not enough PV to reach the set Charge Current 1 limit. For discharging, the inverter will discharge the battery at this set rate even if there is not enough load demand to consume it. The remaining power will be exported to the grid unless Allow Export is set to disable.
- Range: 0A to 290A
- Range: 0A to 290A
- SOC1: The point at which the battery will stop charging or discharging. This is a stopping point for charging/discharging and not starting point.
- Range: Force Charge SOC% to 100%
- Note: The lower limit will vary based on the set Force Charge SOC%
Charge Discharge
4B. Self-Use Mode (Self-Consumption)
If Time-of-Use is not set, meaning the Charge&Discharge settings are not turned on, then the system runs in what we call “default Self-Use Mode”. In this mode, the inverter will prioritize using PV power first to satisfy load demand and then any excess power will go to charge the battery. If there is no battery, the battery is fully charged, or the battery charge limit has been met, then any excess power at that point will either be exported to the grid or curtailed if the system is set for zero export.
The other Storage Mode settings not covered in the previous sections will be explained here.
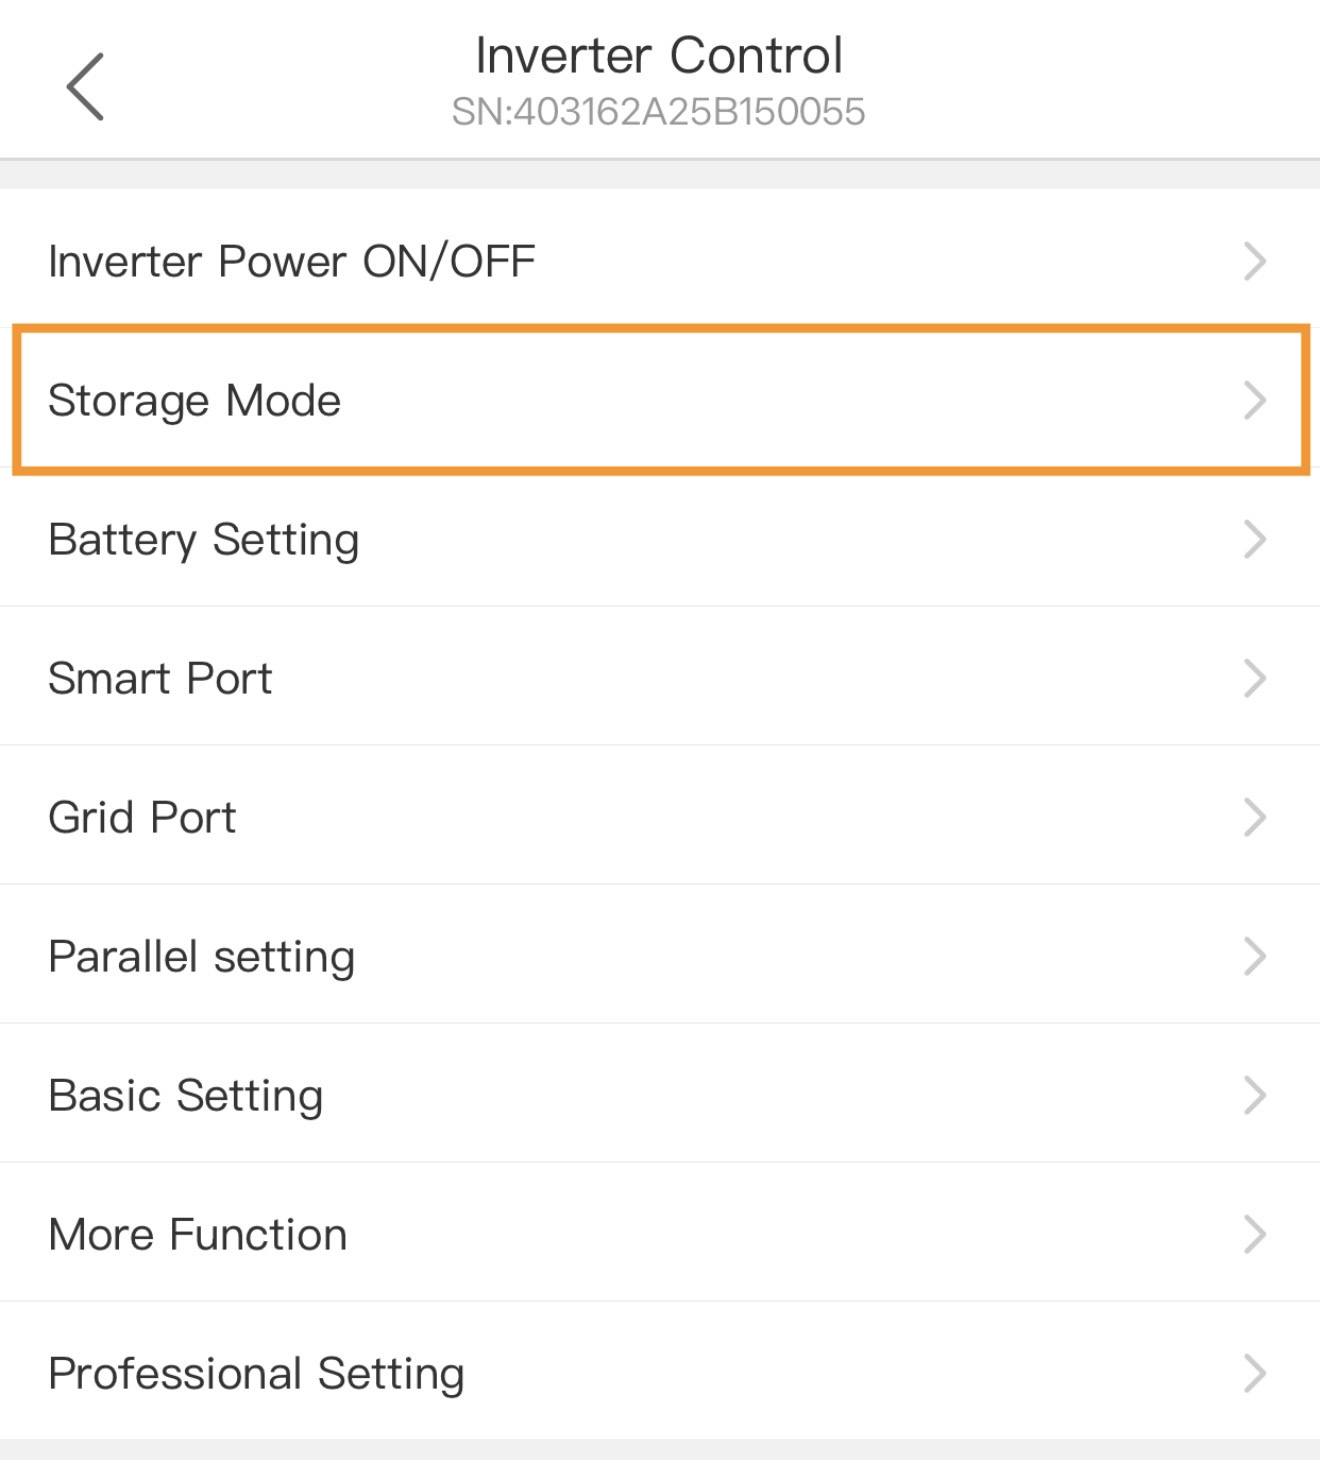
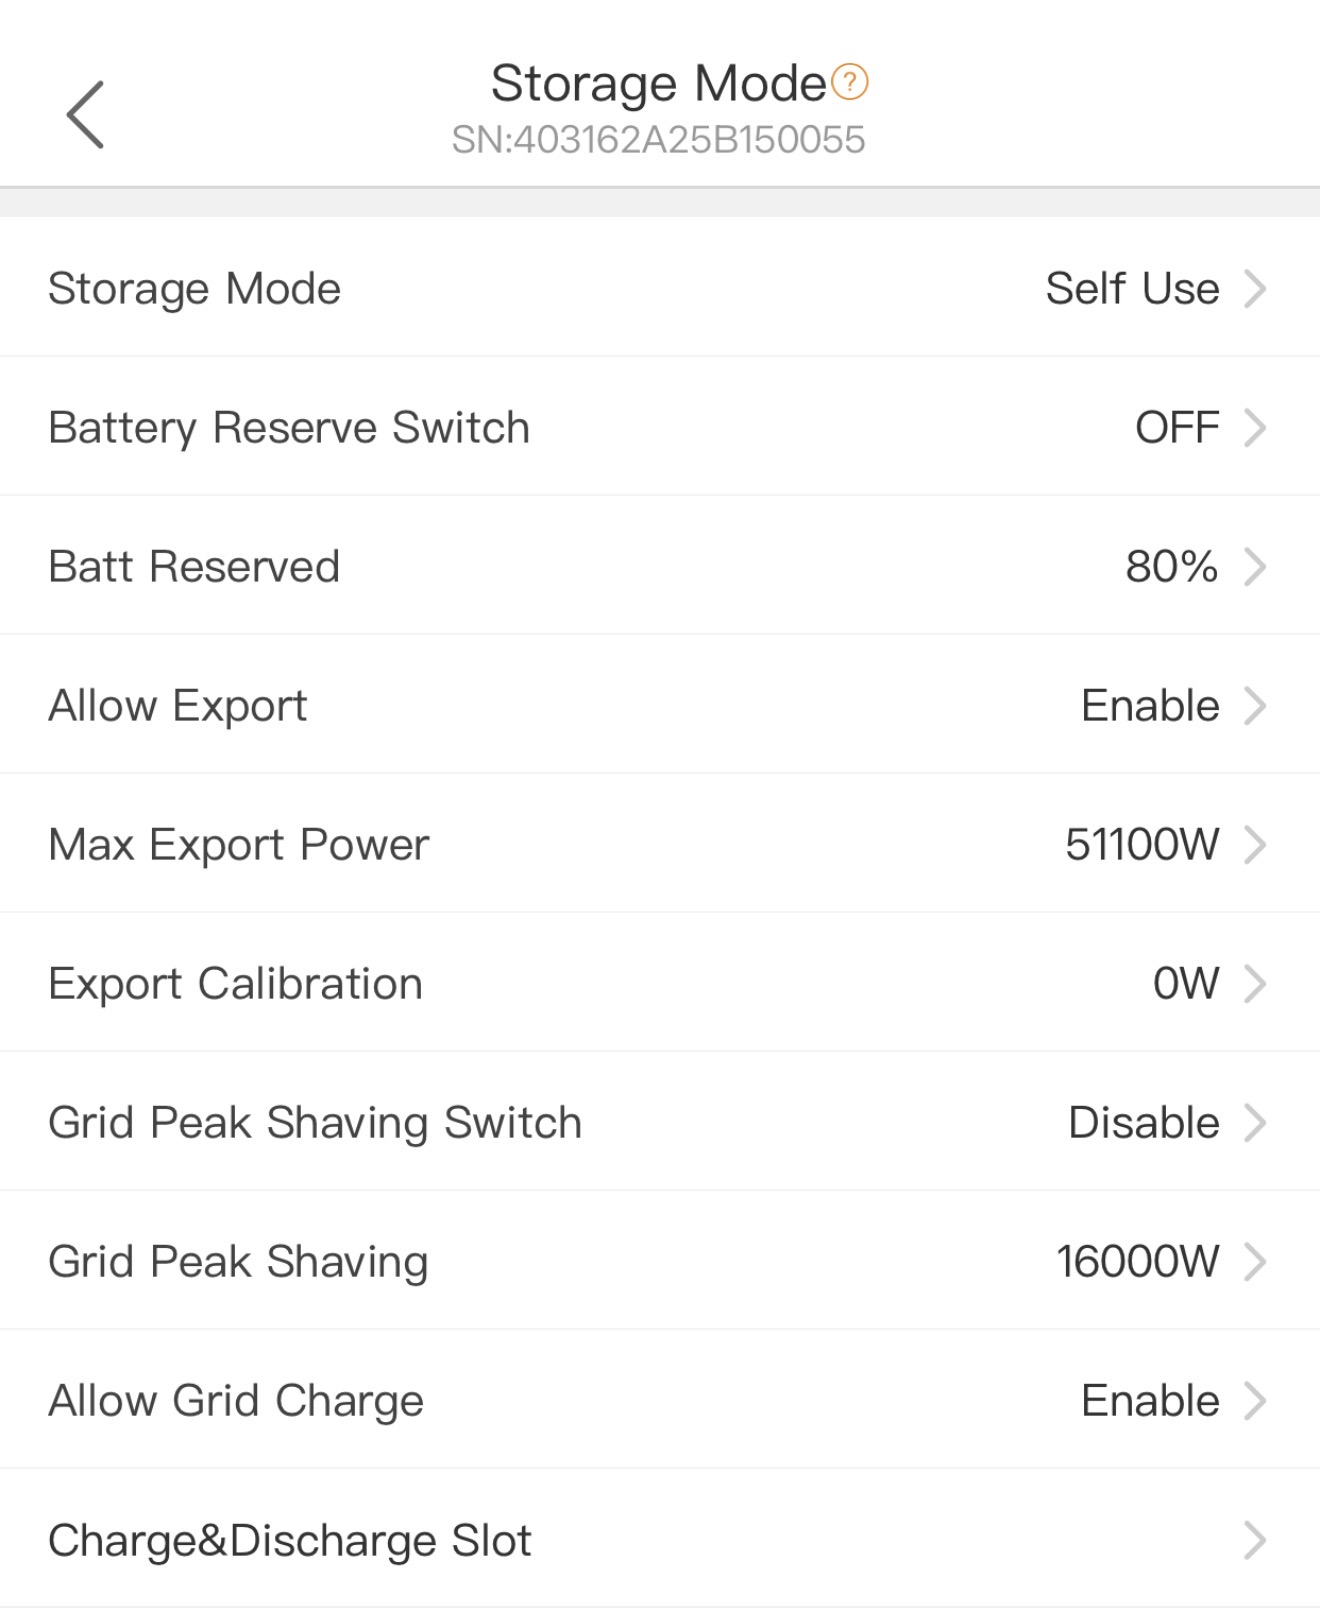
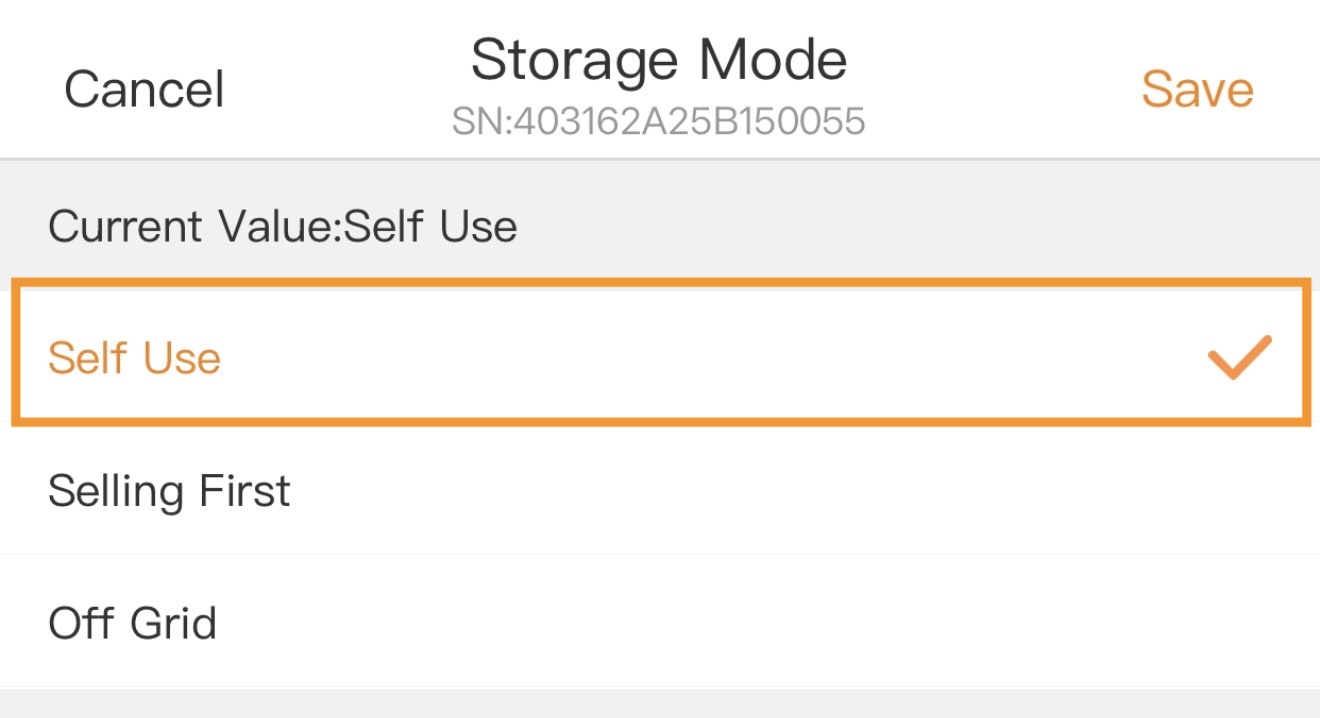
- Storage Mode: The default logic that the inverter will follow. The first priority in all modes is to use PV to supply the loads and meet the full load demand so that no power is imported from the grid. Once the load demand has been met, any excess PV power will go either to charge the battery or to export. The Storage Mode is what decides that. If you select Self Use mode then the inverter will charge the battery with excess PV power. If you select Selling-First mode then the inverter will instead export the excess PV power up to the set Max Export Power limit. Off-Grid mode is only for cabin-in-the-woods no grid ever type systems. That includes a generator as well, meaning if you have an off-grid system with a generator connected to the Grid Port, then you must use Self-Use instead of Off-Grid mode.
- Self Use
- Selling-First
- Off-Grid
4C. Export Power Control Settings
- Allow Export: Turning this switch to Enable permits the inverter to export excess PV power to the grid but only up to the set Max Export Power limit. This function only works if the CTs have been installed. Making this setting Disable will prohibit the inverter from exporting any power to the grid and essentially acts like a zero export mode.
- Range: Enable/Disable
- Max Export Power: A limit in kW of how much power is permitted to be exported to the utility. This setting applies to the full system so if there are multiple units in parallel, then the limit applies to all of the units aggregated as one.
- Range: 0W to 64,000W (64 kW)
- Export Power Calibration: Fine-tunes the export power measurement to account for minor utility meter or CT discrepancies. Current Transformers (CTs) and external energy meters inherently have a small margin of error (measurement deviation). This calibration setting allows you to input an offset to reconcile the inverter's internal power readings with the utility company's official revenue meter.
- Range: -1000W to 1000W
- Range: -1000W to 1000W
4D. Peak-Shaving Settings
- Grid Peak-Shaving Switch: By turning this switch on, you establish a hard threshold (a specific kW limit) for how much power you are willing to draw from the utility grid.
- Range: Enable/Disable
- Range: Enable/Disable
- Grid Peak-Shaving: The specified kW limit of how much power the inverter will allow to be imported from the grid before it begins discharging battery power. As long as your home's real-time power consumption remains below this threshold, the inverter simply imports the needed power from the grid to run your home. The battery remains idle, preserving its stored energy.
- Range: 0W to 64,000W
- Range: 0W to 64,000W
4E. Selling-First Mode (Export Priority)
The only difference between Self-Use and Selling-First is that on Selling-First mode the second priority after meeting load demand will be to export excess PV instead of charge the battery. Battery charging is third priority and only happens after the set Max. Export Power limit has been reached.
To demonstrate, an example has been made below to show how the system would behave given the same configured settings but in Selling First mode instead of Self Use mode.
Example:
- Selling First
- Max. Export Limit set to 4 kW
- Inverter power from PV = 16 kW
- Load Consumption = 3 kW
- Battery charging limit = 16 kW
- Battery charging = PV power minus (load + export power limit)
- 16 - (4 + 3) = 9 kW
- Self Use
- Max. Export Limit set to 4 kW
- Inverter power from PV = 16 kW
- Load Consumption = 3 kW
- Battery charging limit = 16 kW
- Battery charging = PV power minus load
- 16 - 4 = 12 kW
- Note: In Self Use mode the inverter will only permit power to be exported if:
- Allow Export setting is enabled and set for a positive value
- The battery is at the Max. Charge SOC% or the battery charge limit has been reached or there is no battery installed. Charging the battery is always priority over export in self use mode. Selling First mode simply swaps those two priorities so that exporting some power will happen before the battery charges.
Was this article helpful?
That’s Great!
Thank you for your feedback
Sorry! We couldn't be helpful
Thank you for your feedback
Feedback sent
We appreciate your effort and will try to fix the article