This is only a guide for commissioning Briggs & Stratton SimpliPhi 6.6 battery with Solis 16K LV Hybrid. For more detailed instructions please see the Installation & Local Commissioning Guide

Inverter-Side CAN Cable Connection
The pinouts match on both battery and inverter ends. Connect one end of the cable to the “BMS” RJ45 port of the inverter as shown below. You can use a CAT6 shielded cable to connect the two ports together. Be sure to use an ethernet cable tester to ensure both connectors were made correctly and the cable works.
Pin 4 (blue) is CAN-H (CAN High)
Pin 5 (blue-white) is CAN-L (CAN Low)

Battery-Side CAN Cable Connection
Connect the other end of the CAN cable to the “CAN” RJ45 port on the battery. This will be the second port from the left. The pinout matches the Solis CAN port so just using a standard patch cable will suffice. If you are making a CAN cable using RJ45 connectors and a crimping tool, be sure your ends match and use a cable tester to make sure the cable works.

Battery COM (CAN) Port Pinout

Blue wire = CAN_H = Pin 4
Blue-white wire = CAN_L = Pin 5
Briggs and Stratton EnergyTrak Gateway
Single Battery System
When installing the Briggs and Stratton EnergyTrak Gateway, the RS-485 port of the battery will connect to the EnergyTrak Gateway. The CAN port of the battery will connect to the Solis BMS “CAN” port.
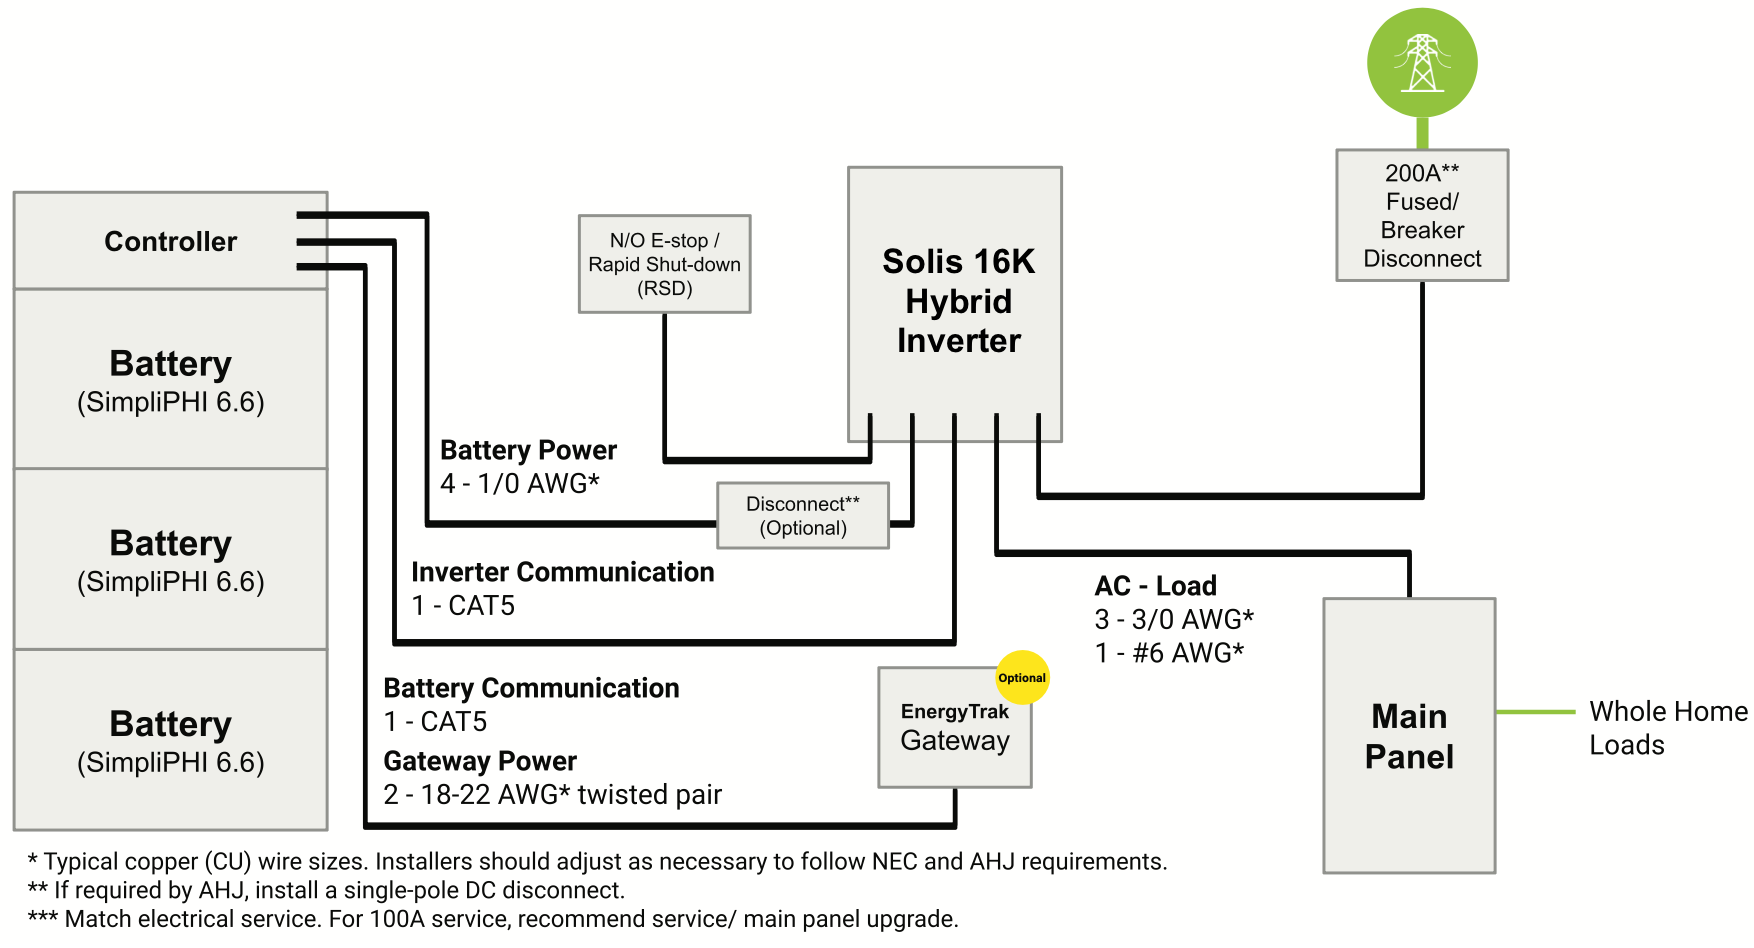
Multiple Battery System
When connecting multiple batteries together in parallel, the RS-485 port of the first battery will connect to the Briggs and Stratton EnergyTrak Gateway. The CAN port of the last battery will connect to the Solis BMS “CAN” port.

Getting Started: Turning the system on and SolisCloud
Battery
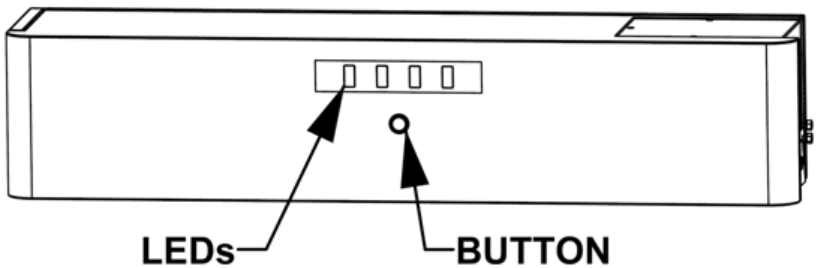
- Turn on the Briggs & Stratton battery by holding the button on the BMS down for hold down until all LEDs on the batteries and Controller are ON. Repeat for each stack that you have installed.
- Turn on AC power from the grid to the inverter. If this is an off-grid setup, then you do not have to do this. If you have PV, be sure any external PV disconnect switches are closed and the array is ready to be energized.
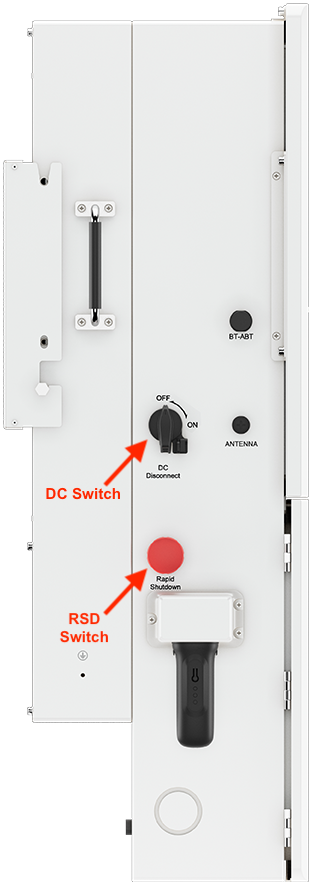
- Turn on the DC disconnect switch located on the side of the inverter.
- Give the red RSD switch a clockwise turn to ensure it is open and not closed. Pushed in means closed (RSD engaged). The button also serves as a soft shutdown emergency power off (EPO) switch. It is a dual purpose switch.
Download the SolisCloud App:
- In the App Store/Play Store search “SolisCloud” and then download the app that has the same icon as this one:

- Register a new Organization account if you are installer and have not yet set up an account yet.
- Log in to SolisCloud
SolisCloud App: Settings configuration
- Tap Service > Local Debugging > Connect with Bluetooth.
- Create a new password for logging in to the inverter
- Configure the Quick Settings. For the battery, select “Lithium Battery LV"
- Once you reach the main overview screen tap “Settings” in the bottom right corner
- Scroll to the bottom and then tap “Device Upgrade”
- Upgrade the firmware on all paralleled Solis inverter-chargers.
- In the bottom menu bar, select Setting > Device Upgrade.
- Upgrade the HMI and DSP.
Note 1: Upgrading inverter firmware is mandatory.
Note 2: All Solis inverters must be use the same firmware version to operate normally. If you are connecting multiple inverters in parallel be sure they are on the same version.
For a guide on how to upgrade inverter firmware please see this article:
Upgrading Hybrid Inverter Firmware Locally
- After upgrading the firmware, in the phone app tap Battery Setting
- In the Battery Setting page, tap "Battery1Setting"
- Make sure the Battery Model is set to Lithium Battery LV. If it is not then you will need to tap "Battery Model”, scroll all the way to the bottom of the list, and then tap “Lithium Battery LV”. Lastly, tap “Save” in the top right corner of the page. Do not select “Lithium Battery LV(RS485)” by mistake, this is the wrong profile and will not work.


Battery Settings & Energy Storage Mode Settings
Please see this guide for detailed explanations of each and every battery-related setting as well as energy storage and export power settings: Battery, Energy Storage, & Export Power Settings Explained
- Set other inverter battery-related settings as required.For instructions on configuring inverter settings, refer to the full Solis manual or the article linked above.
- After all the settings have been configured, check the overview page of the system.
- Follow all manufacturer instructions to power up the inverter DC switch, and turn ON the batteries and other peripheral equipment.
- Use the overview to confirm the battery SOC, battery communications, grid, and load.
- Review and resolve any generated alarms.
- At this point, if the system is grid-connected, AC grid power is turned on.
- Exit the app once the system is running and all checks are complete.
Depending on your system and particular use case, there may be other settings that require configuration. Refer to the inverter manual for information on these settings.
Was this article helpful?
That’s Great!
Thank you for your feedback
Sorry! We couldn't be helpful
Thank you for your feedback
Feedback sent
We appreciate your effort and will try to fix the article