Firmware updates are generally performed to introduce new features or address specific issues.
Note: It is NOT recommended to seek the latest version if the current firmware is functioning properly without issues.
Reading the Current Firmware Version
- In the Advanced Info menu, select Version.
- Press and hold the UP and DOWN buttons together for a few seconds.
- The current software version will display as six characters:
XX YY ZZ.- XX = HMI Version
- YY = Master/Slave Designation
- ZZ = DSP Version
- Example:
D2 01means HMI Version =D2, DSP Version =01.
- The current software version will display as six characters:
Tools Needed for Firmware Update
- Update Tool
- Non-metallic USB Flash Drive (Low capacity, up to 32GB, formatted as FAT32/FAT16/FAT12)

Preparing Firmware Update Files
Important: This process has changed—review steps carefully.
NOTE: All inverter models that are not the same make/model will require different files.
DSP Update Files
- Obtain the following two files:
- Firmware File: Rename to
28062APP.bin - API Key File: Rename to
28062API.bin- Note: The same API Key File works for all DSP updates.
- Firmware File: Rename to
- Place both files in the root directory of the USB drive (no other files should be on the drive).
HMI Update File
- Obtain the HMI update file and rename it as
HMI_WIFI.bin. - Format the USB flash drive as FAT32/FAT16/FAT12.
- Place only the update file in the root directory of the USB drive.
- Use separate USB drives for DSP and HMI updates if both are required.
HMI Firmware Update
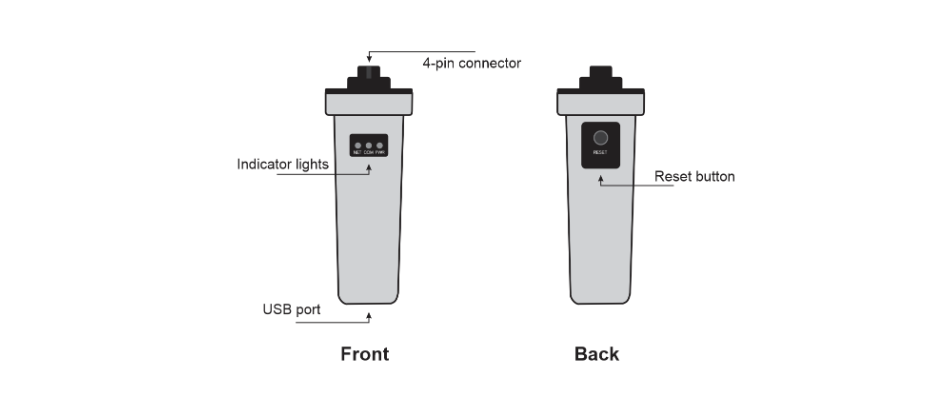
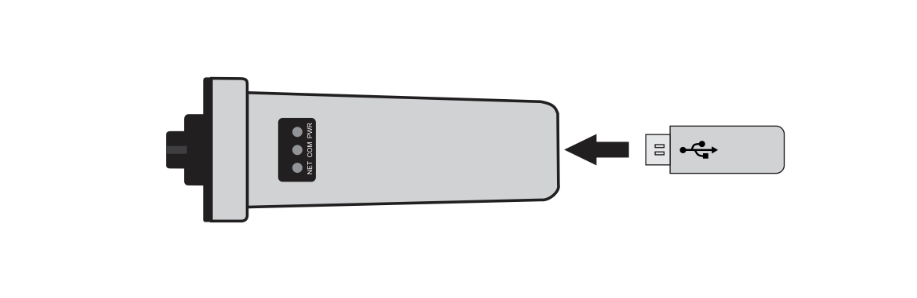
- Insert the USB drive into the bottom of the Upgrade Stick.
- Connect the Upgrade Stick to the RS485 (COM) port of the Inverter.
- Unplug the RS-485 communication wires from the datalogger.
- Set the address to
01. - Ensure both the Red and Green lights are on.
- Press and hold the button on the Upgrade Stick until all three lights (Red, Green, Yellow) are on.

- Navigate to:
- Advanced Settings → Password:
0010→ HMI Upgrade → Enter
- Advanced Settings → Password:
- Press the reset button on the Upgrade Stick (hold for <1 second).
- Green and Yellow lights flashing: Update in progress.
- Flashing stops: Update successful.
- Lights off: Update failed. Retry the above steps.
- Verify the update:
- Check the HMI version at:
Advanced Settings → Password:0010→ HMI Upgrade.
- Check the HMI version at:
- Disconnect the Upgrade Stick and:
- Replace the black protective cap OR reconnect the Solis logger.
If Update Fails
- Request the alternate chip file (e.g., SD vs. GD) and repeat the steps.
Recovering from a Bricked HMI
If the HMI fails during an update:
- Remove power from the device (ensure datalogger power LED is off).
- Reapply power (ensure the datalogger power LED turns on).
- Hold ESC, UP, and ENTER keys for 3 seconds (if not successful, try ESC, DOWN, ENTER).
- Outer LEDs will light solid; the middle LED will blink.
- Operate the Upgrade Tool to send the correct HMI firmware to the microprocessor.
DSP Firmware Update
- Insert the USB drive into the bottom of the Upgrade Stick.

- Connect the Upgrade Stick to the RS485 (COM)port of the Inverter.
- Unplug the RS-485 communication wires from the datalogger.
- Set the address to
01. - Ensure both Red and Green lights are on.
- Navigate to:
- Advanced Settings → Password:
0010→ DSP Upgrade → Enter
- Advanced Settings → Password:
- Press the reset button on the Upgrade Stick (short press).
- Green light flashing: Update in progress.
- Flashing stops: Update successful.
- Light off: Update failed. Retry the steps.
- Verify the update:
- Check the DSP version at:
Advanced Info → Password:0010→ Version.
- Check the DSP version at:
- Disconnect the Upgrade Stick.
Was this article helpful?
That’s Great!
Thank you for your feedback
Sorry! We couldn't be helpful
Thank you for your feedback
Feedback sent
We appreciate your effort and will try to fix the article